An AOT package is a deployment and compilation unit of one or more models that can be applied to a Microsoft Dynamics 365 for Finance and Operations environment, or a Microsoft Dynamics 365 for Retail environment. It includes model metadata, binaries, reports and other associated resources. One or more AOT packages can be packaged into a deployable package, which is the vehicle used for deployment of code (and customizations) on demo, sandbox and production environments. This article guides you through the process of creating and applying a deployable package.
Overview of the process
In order to deploy your code and customizations to a runtime environment (Demo, Sandbox or Production), you must create deployable packages of your solution or implementation. Deployable packages can be created using the Visual Studio dev tools, or by the build automation process that are available on build environments. These deployable packages are referred to as Application Deployable Packages or AOT Deployable Packages. The image below is an overview of the process. Once a deployable package is created, it must be uploaded to the LCS project's asset library. An administrator can then go to the LCS environment page and apply the package to a runtime environment using the Maintain > Apply updates tool.

Note
Application Deployable Packages do not contain source code.
Create a deployable package
After you have completed the development stage, follow these steps to create a deployable package from Visual Studio.
- In Microsoft Visual Studio, select Dynamics 365 > Deploy > Create Deployment Package.
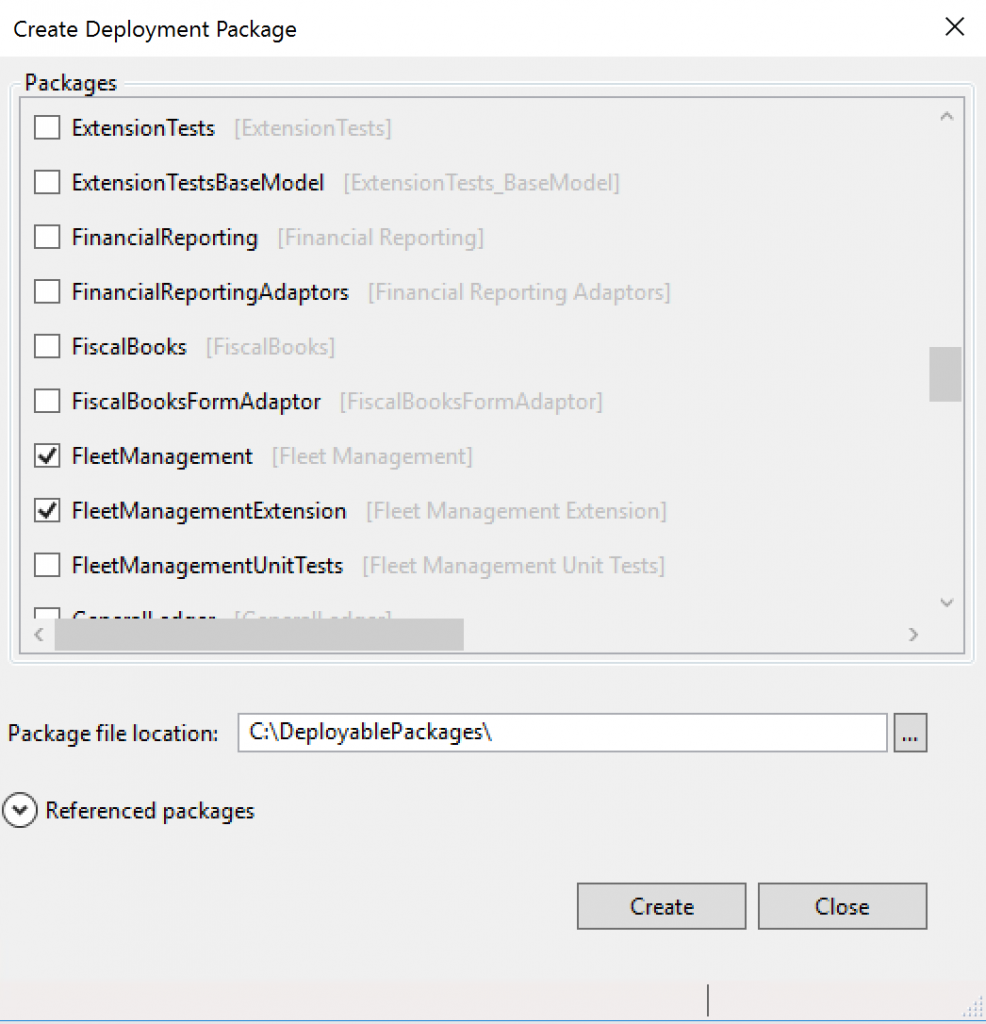
- Select the packages that contain your models, and then select a location in which to create the deployable package.
- After a deployable package is created, sign in to Microsoft Dynamics Lifecycle Services (LCS), and then, in your LCS project, click the Asset Library tile.
- Upload the deployable package that you created earlier.
Apply a deployable package to Sandbox environments.
Prerequisite steps
- Make sure that the package that should be applied is valid. When a package is uploaded to the Asset library, it isn't analyzed. If you select the package, the package status appears in the right pane as Not Validated. A package must pass validation before it can be applied in an environment by using the following procedures. The status of the package will be updated in the Asset library to indicate whether the package is valid. We require validation to help guarantee that production environments aren't affected by packages that don't meet the guidelines.There are three types of validations:
- Basic package format validations
- Platform version checks
- Types of packages
- Make sure that the package is applied in a sandbox environment before it's applied in the production environment. To help guarantee that the production environment is always in a good state, we want to make sure that the package is tested in a sandbox environment before it's applied in the production environment. Therefore, before you request that the package be applied in your production environment, make sure that it has been applied in your sandbox environment by using the automated flows.
- If you want to apply multiple packages, create a merged package that can be applied first in a sandbox environment and then in the production environment. Application of a single package in an average environment requires about 5 hours of downtime. To avoid additional hours of downtime when you must apply multiple packages, you can create a single combined package that contains one package of each type. If you select a binary package and an application deployable package in the Asset library, a Merge button becomes available on the toolbar. By clicking this button, you can merge the two packages into a single package and therefore reduce the total downtime by half.
- Make sure that the Application binary update package is applied to your dev/build environment before it is applied to your sandbox and production environment - If the application binary package is applied directly to your Tier 2+ sandbox environment but is not applied on your dev/build environment, the next time you move an AOT package from dev/build box (which does not have the same application binaries as your sandbox environment) to sandbox, some of the application binaries will be overwritten with what is in your dev/build environment. This could result in a regression of the version of your sandbox environment.
Before you begin, verify that the deployable package has been uploaded to the Asset library in LCS.
- For a binary update, upload the package directly to the Asset library. For information about how to download an update from LCS, see Download updates from Lifecycle Services.For an application (AOT) deployable package that results from an X++ hotfix, or from application customizations and extensions, create the deployable package in your development or build environment, and then upload it to the Asset library.
- Open the Environment details view for the environment where you want to apply the package.
- Click Maintain > Apply updates to apply an update.
- Select the package to apply. Use the filter at the top to find your package.
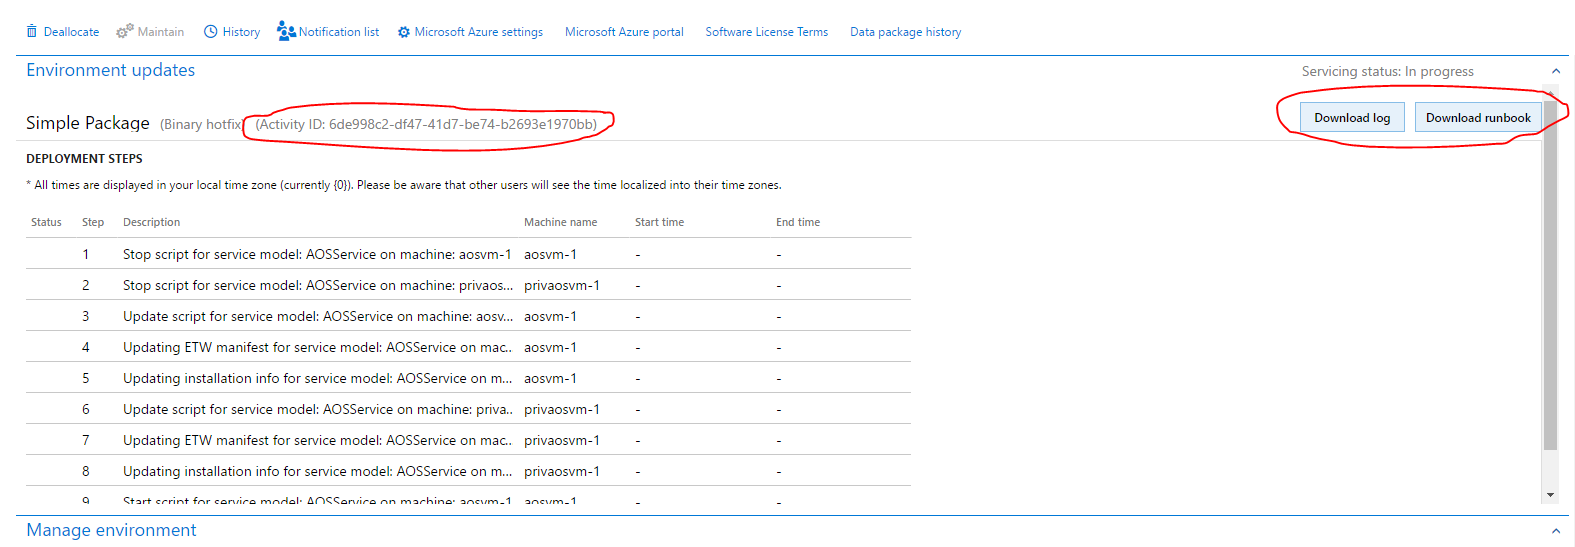
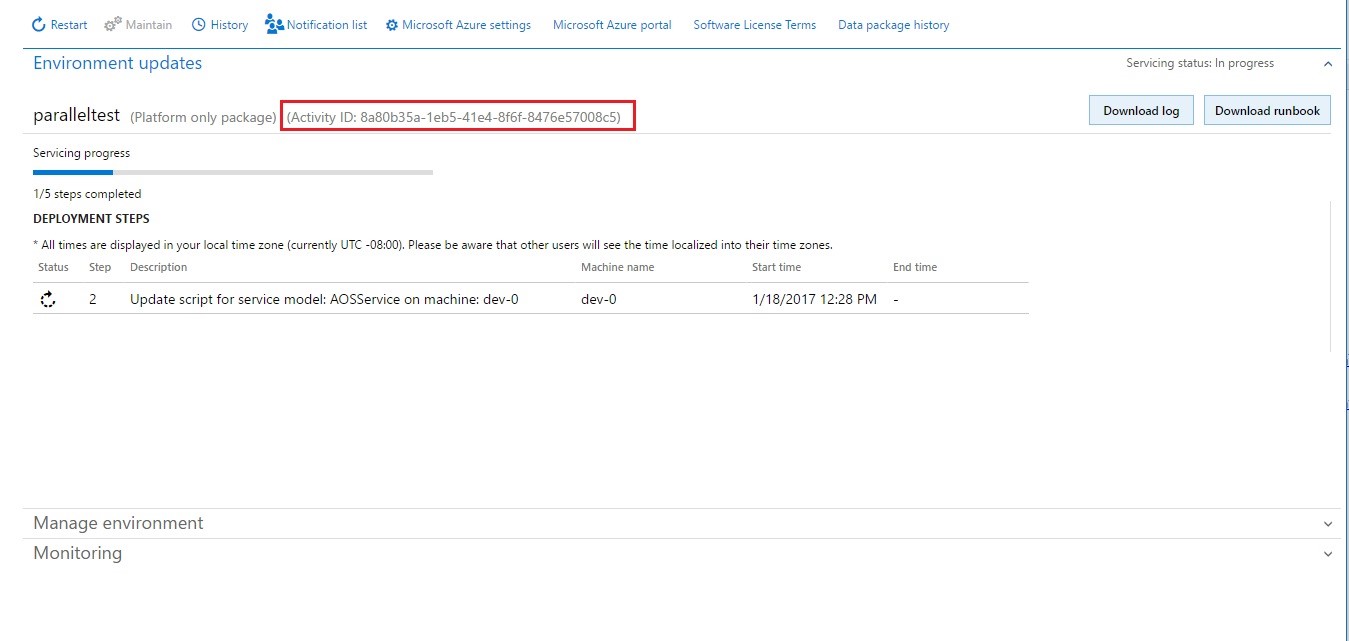
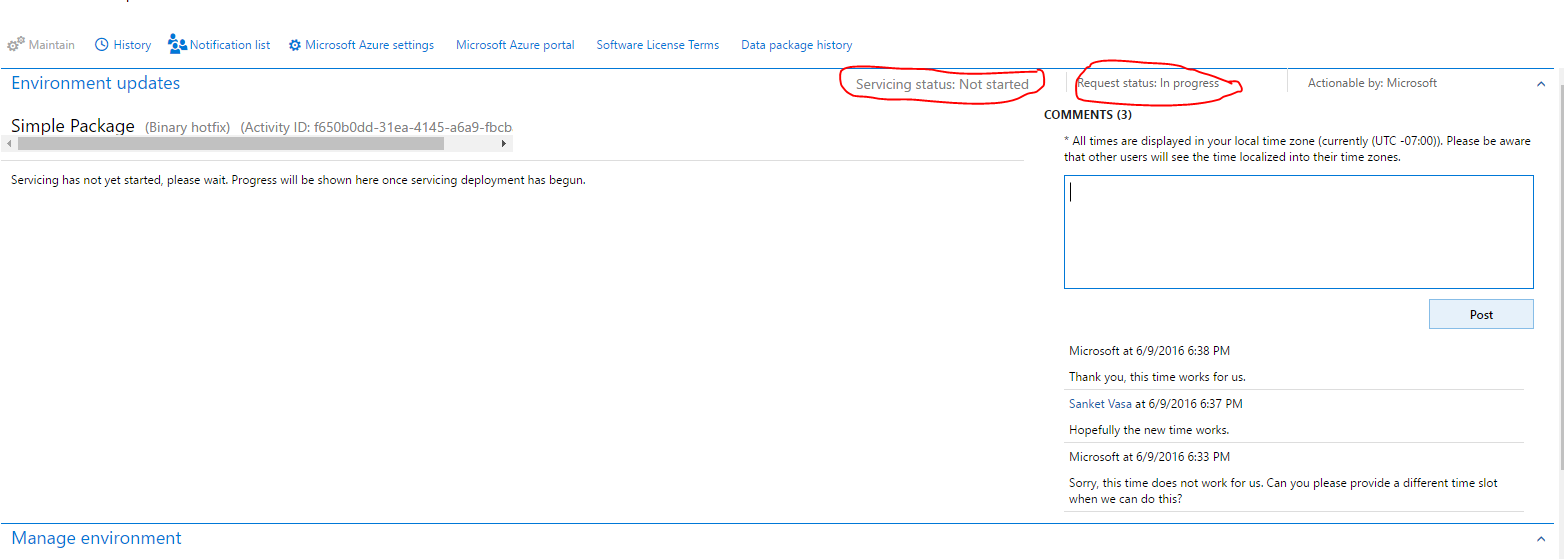
- Click Apply. Notice that the status in the upper-right corner of the Environment details view changes to Queued, and that an Environment updates section now shows the progress of the package.

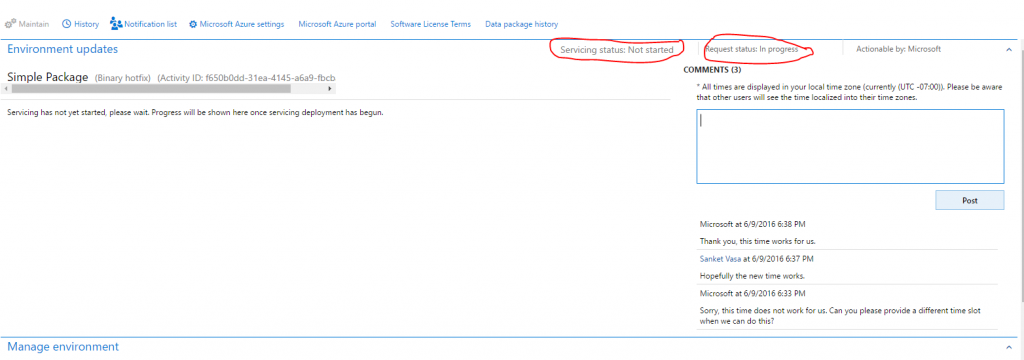
- Refresh the page to see the progress of the package application. Notice that the servicing status is In Progress, and that the environment status is Servicing.

- Continue to refresh the page to see the status updates for the package application request. When the package has been applied, the environment status changes to Deployed, and the servicing status changes to Completed.

- To sign off on package application, click Sign off if there are no issues. If issues occurred when you applied the package, click Sign off with issues.
Troubleshooting
General troubleshooting/diagnostics
If package application isn't successful, you can download either the logs or the runbook to see the detailed logs. You can also use RDP to connect to an environment so that you can fix issues. If you must report the issue to Microsoft, be sure to include the activity ID that is reported in the Environment updates section.
Using the logs
- Download the logs.
- Unzip the log files.
- Select the role that a step failed for, such as AOS or BI.
- Select the VM where the step failed. This information appears in the Machine name column in the Environment updatessection.
- In the logs for the VM, select the folder that corresponds to the step where the issue occurred. The folder name identifies the step that each folder corresponds to. For example, if the issue occurred in the executing of a step, select the ExecuteRunbookfolder.For example, if the folder name is ExecuteRunbook-b0c5c413-dae3-4a7a-a0c4-d558614f7e98-1_I0_R0, the step number is highlighted and is the number after the globally unique identifier (GUID).
Package failure
If package application isn't successful, you have two options:
- Click Resume to retry the operation that failed.
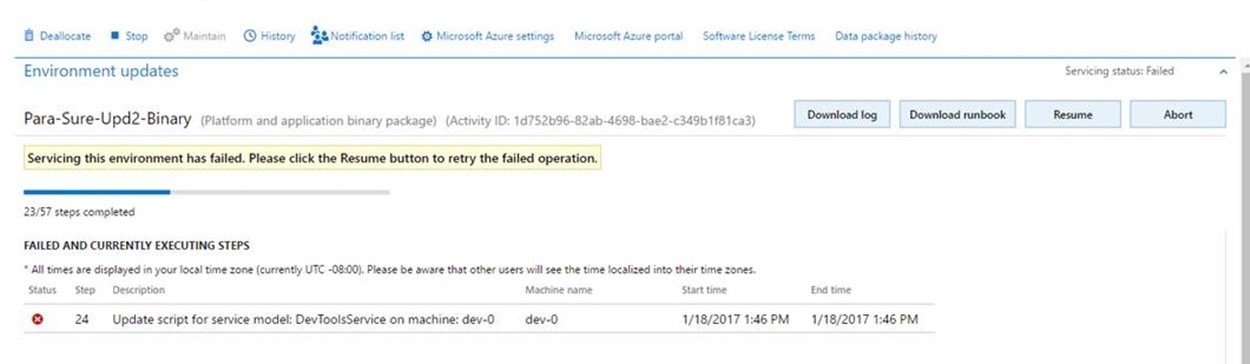
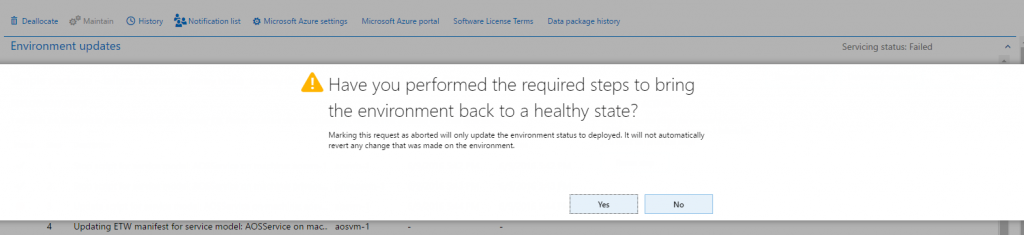
- Click Abort to stop package application.NoteIf you click Abort, you don't roll back the changes that have already been made to your environment. To proceed, you must fix the issue.

Apply a package to a production environment by using LCS
n a production environment, unlike in a sandbox environment or other types of environments, package application through LCS isn't self-serve. Customers and partners must submit a request to Microsoft to apply a package when the customer is ready for the downtime.
- Download an update from LCS. For information about how to download an update from LCS, see Download updates from Lifecycle Services.
- For a binary update, upload the update deployable package directly to the Asset library.
- For an application/X++ update, apply the package in a development environment. After you resolve any conflicts, generate a deployable package from Visual Studio, and upload the package to the Asset library. For information about how to upload to the Asset library and create a deployable package, see Create deployable packages of models.
- On the Asset library page in LCS, on the tab that corresponds to the asset type (Software deployable package), select a package, and then click Release candidate.
- Apply the package in a sandbox environment by using the instructions earlier in this topic.
- After the package is successfully applied and signed off in the sandbox environment, open the Asset Library, and mark the package as Release Candidate.
- Open the Environment details view for the production environment where you want to apply the package.
- Click Maintain > Apply updates to apply the package.
- Select the type of package to apply.
- Select the package to apply in your production environment, and then click Schedule to submit a request to apply it.NoteThe list of packages includes only the packages that have been successfully signed off in the sandbox environment, and that have been marked as release candidates.
- Specify the date and time to schedule package application for, click Submit, and then click OK to confirm. Note that your environments will be down and unavailable to perform business while the package is being applied.
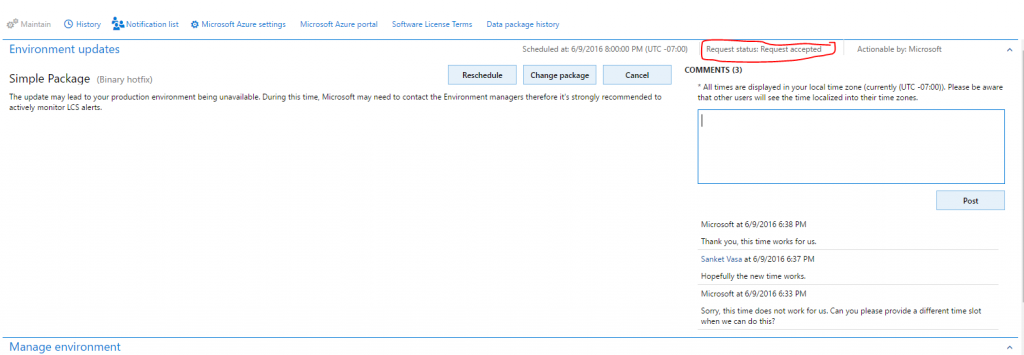
- Refresh the page. Two fields on the page indicate the status of the request.
- Request status – This field indicates the status of the request that you submitted to Microsoft.
- Actionable by – This field indicates who must take action.
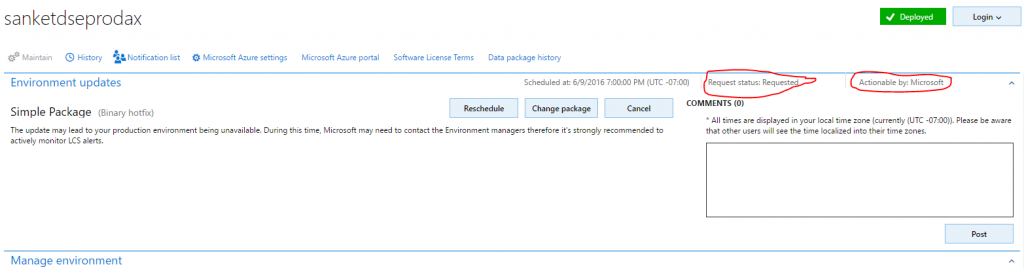
- Microsoft either accepts or denies the request.
- If the request is accepted, Microsoft begins to update the environment.
- If the request is denied, Microsoft informs the customer about the reason for denial and the action that the customer must take. The customer can then reschedule the request, change the package, or cancel the request.
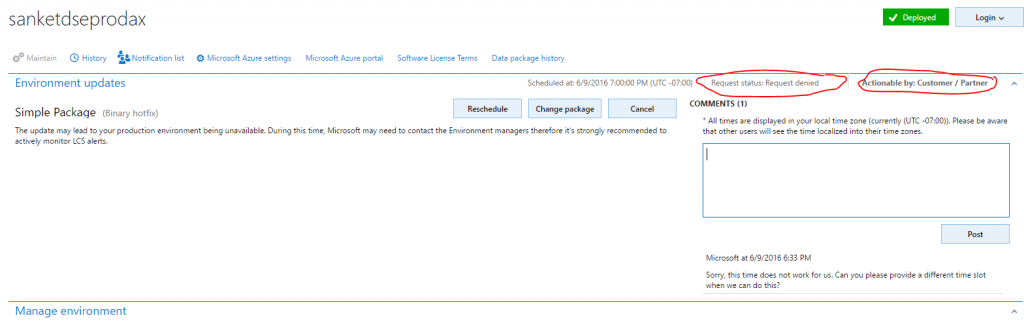 At any time, the customer can use the Comments field to post comments to the request.
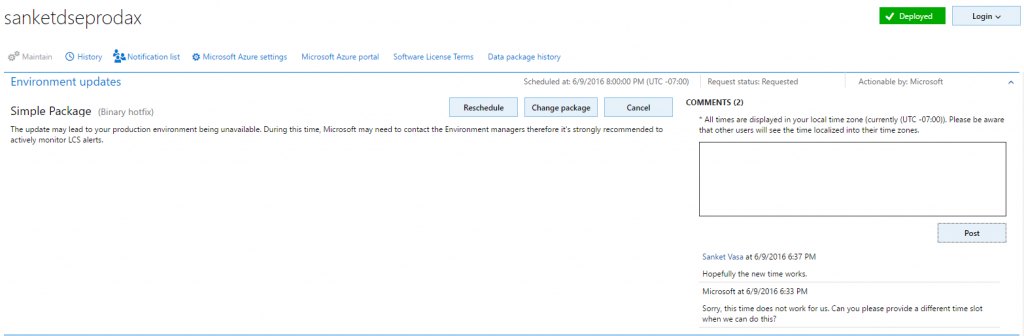
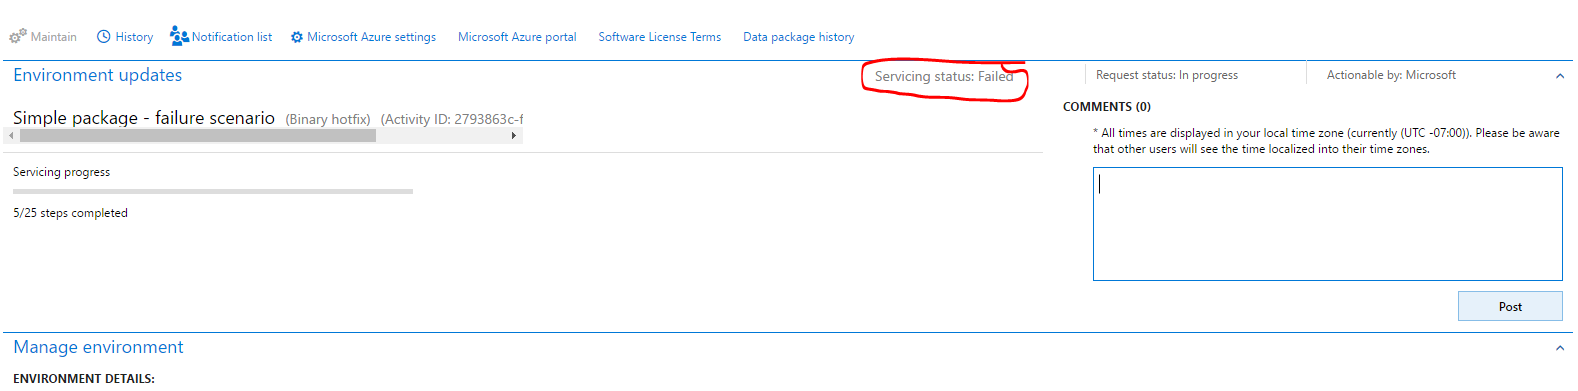
- After the environment is serviced, you can monitor the status. The Servicing status field indicates the status of package application.
 Additionally, a progress indicator shows the number of steps that have been run, out of the total number of steps that are available.
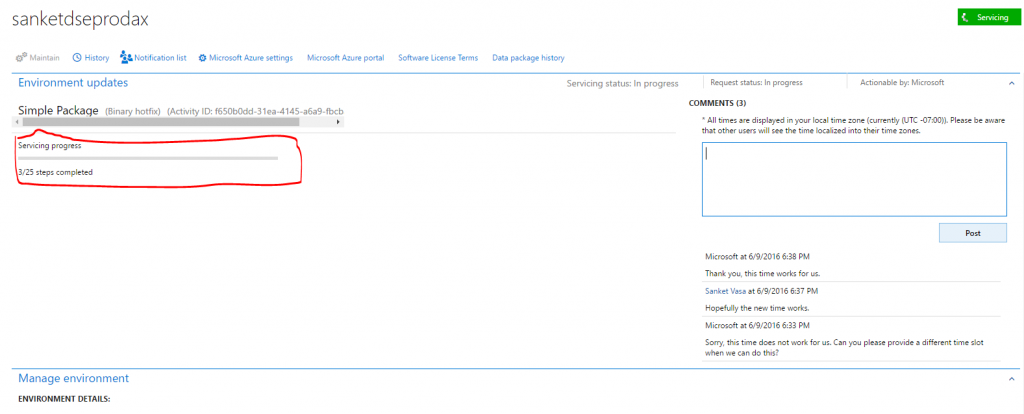
Successful package application
- After the deployment is successfully completed, the Servicing status field is set to Completed, but the Request status field is still set to In progress because the request hasn't yet been closed.

- After Microsoft has finished applying the request, you must close the request by clicking Close servicing request.
- When you close a successful request, in the Edit work item details dialog box, set the Service request status field to Succeeded, and then click Submit.
Unsuccessful package application
- If package application isn't successfully completed, Microsoft will investigate the issue. The Servicing status field will indicate that package application has failed.
- When deployment fails, Microsoft can abort the package, revert the environment to a good state, and send the request back to the customer, so that the customer can validate the environment and close the request. If there is an issue in the package, the customer must submit a new request that includes the new package.
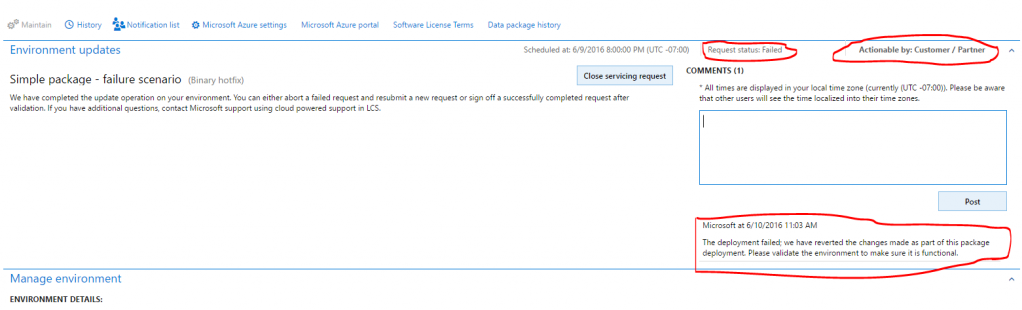
- When you close a failed request, in the Edit work item details dialog box, set the Service request status field to Aborted.
For more details please refer below post.

tale of this weblog is properly written. the author kept in consideration the grammar very well. stage of English also very well. Lot many new phrases has been used while writing content material of this weblog. Antibacterial Spray in USA
ReplyDeleteYes, personal finance is possible if you are determined to. You can save $100-$200 per month for ten years, then use that saved money to buy stocks, mutual funds, bonds, or any other investment vehicle. With sound investment principles, you may make a decent return on investment after some time. You can also make personal finance by investing in real estate. But this is not recommended because it involves lots of time, money, and effort. It is better to make personal finance by buying stocks, mutual funds, or bonds.index funds
ReplyDeletetogel online
ReplyDelete