Showing posts with label D365 F&O. Show all posts

Tuesday, November 9, 2021

Zero Padding Numbers in D365 F&O x++

 Sometimes we need to add padding numbers in the files in AX. Ex: Postive pay files

I found the below post that helped to add the padding zero numbers in the positive pay file.

Original post: http://www.atomicax.com/content/zero-padding-numbers


AX provides us with an easy way to pad strings with extra characters. A common situation where this is required is use a "fake" number sequence inside AX.
If you wish to increment a counter, but store or display it as a string such as "ABC-00001", "ABC-00002" etc then padding the counter with zeros is required.

We can use the strRFix() and strLFix() methods to achieve this.

static void testZeroPadding(Args _args)
{
    int i = 1;
    str padded;
    str finalResult;
    ;
    // Create a string, with a length of 5, ending with the value of i and padded with zeros
    padded = strRFix(int2str(i), 5, "0");
    finalResult = strFmt("ABC-%1", padded);

}

This will populate finalResult with ABC-00001. If we use strLFix instead of strRFix, it will pad to the right with zeros, giving us ABC-10000.

Alternatively, you could use a function like this: (However, the approach above is most likely faster)

static str zeroPad(str item, int numZero)
{
    int i;
    str out;
    ;
    for(i=0;i<numZero-strlen(item); i++)
    {
        out += "0";
    }

    return(out + item);
}

UPDATE CUSTOM FIELDS IN CUSTTRANS/VENDTRANS FROM LEDGERJOURNALTRANS DURING THE POSTING OF JOURNAL D365 fo x++

Original post: https://allaboutdynamic.com/2018/06/25/d365-ax7-update-custom-fields-in-custtrans-vendtrans-from-ledgerjournaltrans-during-the-posting-of-journal/

 Need to update/carry/flow Custom Fields In CustTrans/VendTrans From LedgerJournalTrans during the posting of journal.

Sample Code

[ExtensionOf(classStr(CustVendVoucher))]

final class AcxCustVendVoucher_Extension

{

public void post(

LedgerVoucher _ledgerPostingJournal,

CustVendTrans _custVendTrans,

NoYes _approval,

UnknownNoYes _euroTriangulation,

boolean _withHoldTaxType,

boolean _useSubLedger)

{

LedgerJournalTrans  ledgerJournalTransLocal;

VendTrans   vendTransUpdate;

Common  commonLocal = common;


next post(_ledgerPostingJournal, _custVendTrans, _approval, _euroTriangulation, _withHoldTaxType, _useSubLedger);

if (commonLocal.TableId == tableNum(LedgerJournalTrans))

{

ledgerJournalTransLocal = commonLocal;

if (_custVendTrans.tableid == tableNum(vendTrans))

{

ttsbegin;

//*******NOT Recommended*********

//either update in vendTrans or custtrans

select firstonly1 vendTransUpdate

where vendTransUpdate.RecId == _custVendTrans.RecId;

vendTransUpdate.selectForUpdate(true);

vendTransUpdate.DocumentNum = ledgerJournalTransLocal.accountName();

vendTransUpdate.doUpdate();

ttscommit;

//*******Recommended*********

//or insert record with reference of VendTrans.RecId into a seperate table like AcxVendTrans

}

}

}


}


Copy custom field value from Accounts Payable (LedgerJournalTrans) to Invoice (VendTrans) in d365 fo x++

 When creating a accounts payable invoice register entry it will create a record in the table LedgerJournalTrans. Whenever you post this journal it will create a record for the journal in the VendTrans table.


If you go into the Invoice Approval form and click on "Find Vouchers" you will see that any custom fields you added to LedgerJournalTrans are available. However once one of these vouchers are loaded into the approval form you will find that the values are longer available. This is because it has converted your LedgerJournalTrans instance into its own VendTrans table instance.

In order to copy the values from LedgerJournalTrans to VendTrans you will need to extend the VendVoucher class which is shown below. It is good to note that in theory this method should be able to be applied to the CustVoucher (customer invoices) as it applies the same structure (CustVendTrans map) and using the common table method to pass VendTrans or CustTrans. 


[ExtensionOf(classStr(VendVoucher))]
final class APInvoiceModsVendVoucher_Extension
{
    

    /// <summary>
    /// COC of initCustVendTrans which sets the initial values of vendTrans from ledgerjournaltrans
    /// </summary>
    /// <param name = "_custVendTrans">VendTrans</param>
    /// <param name = "_ledgerPostingJournal">LedgerVoucher</param>
    /// <param name = "_useSubLedger">Use sub ledger default is false</param>
    protected void initCustVendTrans(
                                    CustVendTrans _custVendTrans,
                                    LedgerVoucher _ledgerPostingJournal,
                                    boolean _useSubLedger)
    {
        //execute the base functionality
        next initCustVendTrans(_custVendTrans, _ledgerPostingJournal, false);
        
        //get vendTrans table buffer form CustVendTrans map instance
        VendTrans vendTrans = _custVendTrans as VendTrans;
        
        //if the common instance is being initialized via the ledgerjournaltrans table we need to copy the custom field
        if (common && common.TableId == tableNum(LedgerJournalTrans))
        {
            LedgerJournalTrans ledgerJournalTrans = common;
            
            //copy internal invoice notes and the description from the ledgerjournal trans to the vendtrans
            vendTrans.CustomField = ledgerJournalTrans.CustomField;
            //this is not a custom field but the values do not get transfered
            vendTrans.Txt = ledgerJournalTrans.Txt;
        }
    }

}

How to filter records in a form by code using extensions in d365 F&O x++


 In this case I'm filtering vendor invoice journals by creating an extension class in the form datasource -> init() method


I'm trying to filter vendor invoices with USD currency code


[ExtensionOf(formDataSourceStr(vendinvoicejournal, VendInvoiceJour))]

final class RKFormDS_VendInvoiceJournal_Extension

{

    public void init()

    {

        next init();


        str formName =  this.formRun().name();

        str callerName =  this.formRun().args().callerName();


        if(formName == 'VendInvoiceJournal' && callerName == 'RKVendInvoiceJournal')

        {

                          this.query().dataSourceName(this.name()).addRange(fieldnum(VendInvoiceJour, Currency)).value(SysQuery::valueLike("USD"));

            }


        }

    }


For more details please refer following link: http://dynamics-ax-live.blogspot.com/2010/03/how-to-filter-records-in-form-by-code.html

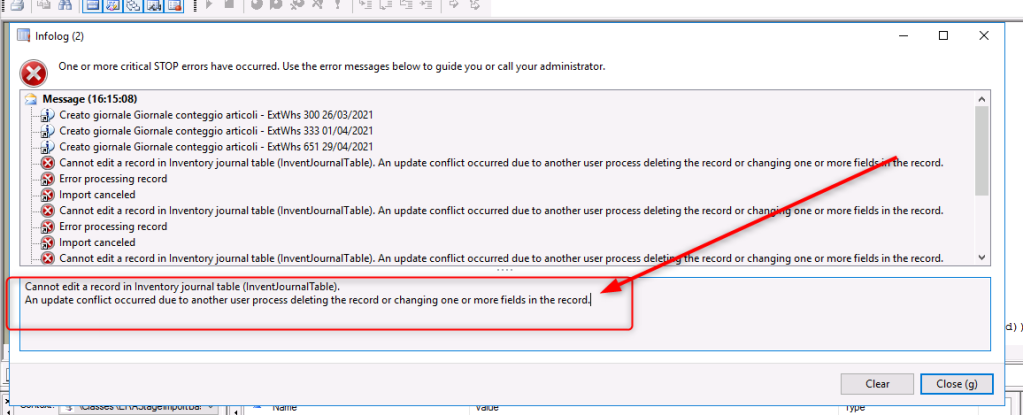
Cannot edit a record in Sales Orders (SalesTable). An update conflict occured due to another user process deleting the record or changing one or fields in the record D365 FO


This error usually occurs when you are trying to update a table, but the table was previously updated by another operation.

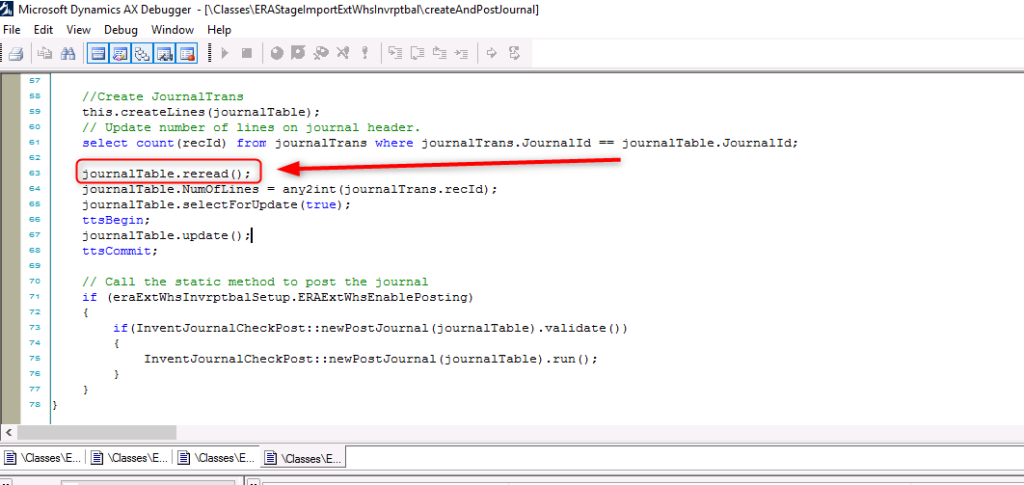
In this case it is advisable to call the reread () method of the table before updating.

Something like that :

1
2
3
4
5
6
journalTable.reread(); //--> try this before update method
journalTable.NumOfLines = any2int(journalTrans.recId);
journalTable.selectForUpdate(true);
ttsBegin;
journalTable.update(); //Update method
ttsCommit;

Original post: https://d365ffo.com/2021/05/13/d365ffo-ax-how-to-resolve-error-cannot-edit-a-record-in-table-an-update-conflict-occurred-due-to-another-user-process-deleting-the-record-or-changing-one-or-more-fields-in-the-reco/
Also, refer another blog: http://daxdude.blogspot.com/2013/02/ax-issue-cannot-edit-record-in-sales.html

What Is Upgrades, Updates and Hotfixes in D365 F&O

Original Post: https://www.codecrib.com/2017/06/upgrades-updates-and-hotfixes-in-ax7.html?m=1


In Dynamics 365 for Operations (affectionately known as AX7), there is a clear distinction between binary hotfixes and metadata hotfixes (in LCS shown as “binary updates” and “X++ updates”). The product also has monthly platform releases and as of this writing a twice a year application release. I wanted to take a bit of time to explain the details of each and the distinction between them.

To provide context for this post, it’s important to note that the product is split in two parts:

  • Platform: kernel things, and some X++ code that are lower-level; things like batch framework, number sequences, print management, user info, etc.
  • Application: The actual business logic. Customers, sales orders, production module, etc. Also some binary things like financial reporting (MR) and the SSRS framework for AX.

Platform Releases After the release of Platform Update 4 (in February 2017), the platform now releases a monthly update. The platform consists of both the lower-level kernel binaries, as well as some X++ packages. However, the platform packages are “sealed” from over-layering, so even though you do get updated X++ code on your development boxes, you don’t actually compile or customize these. You can extend them, of course. Each platform release contains any hotfix on the last platform, plus any new features (so they are cumulative - no need to install each one individually, just take the latest). Since this is just platform, the impact on the functionality is extremely minimal. Additionally, any code changes made by developers at Microsoft is checked for breaking changes (which are not allowed). This means the database schema cannot be changed (for the most part) and all APIs (method signatures etc.) should remain the same. This ensures any extensions won’t break - the expectation is they don’t need to be recompiled (i.e. you update platform, but no need to recompile/redeploy your extension packages). There are also backward compatibility checks to make sure older version of the application can run on newer versions of the platform. In reality this all means that you can compile any code you have on an old platform, and deploy it on an environment with a newer platform - because the runtime is backwards compatible. As a result, many ISVs will develop and build their code on a “common” platform (for example, the fall release 2016 was released on Platform Update 3, and customers can install it on a newer platform (say, platform 7). This also means that there are no individual hotfixes to pick. First, unless a really nasty issues appears, bugfixes will just come in the next month’s update. But if there are critical fixes, they will be cumulative - meaning each new hotfix is just a newer build of the same platform; get the latest and you have all hotfixes.

Application Releases The application actually consists of a few different things. Binaries and metadata. Application binaries are considered things like MR, SSRS components for AX, etc. Metadata is considered all the X++ code related to the application (sales orders, customers, etc.). An application release is considered a major or minor version change. For example, the original version of AX7 had application 7.0. The fall release (2016) was 7.1. Spring release in 2017 is 7.2. Note that this is different than the platform - the platform will be backwards compatible, so there’s no major or minor release change. An application release then also means it’s both the binaries and the metadata combined as one release.

Now, how do you consume these updates and upgrades?

Application Metadata Hotfixes Since as of this writing (2017!) you can still over-layer the application code, it means metadata hotfixes come in the form of X++ hotfixes. You have to install the hotfix on a development box, which fixes the existing code - and then you have to build and create a deployable package to actually consume the hotfix somewhere. You can download hotfixes from issue search of the “X++ updates” tile on an environment’s page (at the bottom). Since these are just hotfixes, they have no impact on the actual application release you are running. You just have your original release, plus some hotfixes. Since you add those to source control to get built by the build VM, you only install them once and other developers will just synchronize them onto their boxes from source control.

Application Binary Hotfixes Since the application is split in metadata as well as binaries, as explained above, you also need binary hotfixes next to the metadata hotfixes. These will be things like hotfixes for MR for example. These can be download from issue search, or also with the next update described. This will change once the application is sealed from over-layering.

Platform Updates Platform updates effectively update your platform as described in the platform release above. A platform update can be download from the global asset library and deployed.

Binary Updates On an environment page, there is also a tile called “Binary Updates”. On environments of platform update 4 or newer, this effectively lets you download the latest version of the platform, as well as any application binary hotfixes. Since the tile is a combination of application binary hotfixes as well as platform updates, just installing a platform update from the global asset library (as described above) will not necessarily set the tile counter to 0 (zero) since there may still be applicable application binary hotfixes.

Application Upgrades As of this writing, an application version is released twice per year (typically spring and fall releases). Since this changes the application functionality, it requires a code upgrade, full testing of the application and customizations, and a data upgrade.

Summary </u></u>

WhatWhere to getContentsHow to DeployCode Upgrade RequiredData Upgrade required
X++ UpdatesEnvironment page
Issue Search
SCDPP package with X++ code changesInstall on Dev box, build/package, deployNO, but potential code conflict/merging required for over-layering codeNO
Binary UpdatesEnvironment pagePlatform Update (code+binaries)
Application Binary Hotfixes
LCS, manual runbookNONO
Platform UpdatesBinary Updates
Global Asset Library
Platform Update (code+binaries)LCS, manual runbookNONO
Application ReleaseLCS DeploymentEverything - application, platformRedeploy Environments (transparent for production environments)YESYES

How to setup email notifications on workflows in D365 F&O

Original post: http://d365tour.com/en/microsoft-dynamics-d365o/email-notifications-workflows/


Today we’re going to see how to manage workflow notifications in D365 Supply Chain Management.

Indeed, there are 3 methods that we will discover during 3 chapters: Via the calendar, via the action center or via e-mails.

Via the calendar

The first one is the basic method, which is visible directly on the home screen.

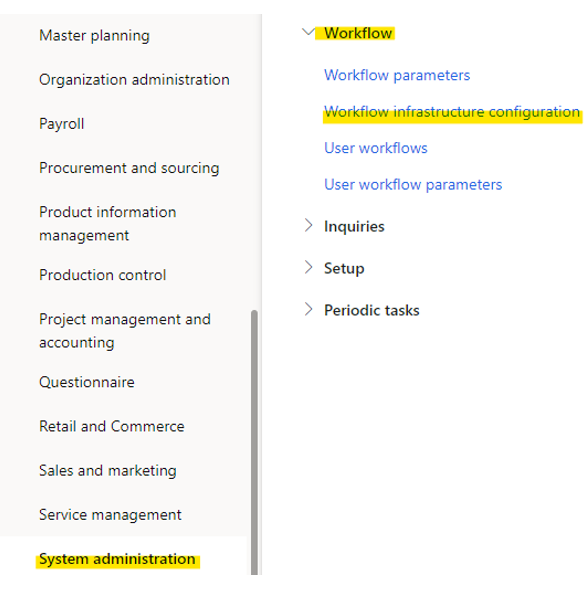
The only condition is that you must have launched the workflow batch in « System administration \ WorkFlows \ Workflow infrastructure configuration » :


There are some HyperText links under the calendar :


Via Action Center

The second one is via the action center.

For this method a little more configuration is necessary but nothing too complicated.

Indeed in the options of the user it is necessary to go to check the box « Send notifications to Action Center » :


This has the effect of adding this type of notification:


and if we open the pane on the right we have more detail :


Note that there is sometimes a delay before the appearance of the notification.

Via e-mail

The last method is to send email notifications.

And here … it’s not the same story anymore.

3 methods of sending emails are configurable : EML, Exchange et SMTP.

Here we will focus on the SMTP method.

Let’s start by looking at what to do with user options.

there is two things to do :

·        Configure the email address that will receive the notifications. If this field is empty, notifications will not be sent:


·        Check the case « Send notifications in email » :


This is all we have to do at the user level (except that it must be done for all users who want to receive email notifications).

Now let’s go to the system settings.

The first step is to configure the sending of emails for SMTP.

To do this, go to the module « Systeme Administration \ Setup \ E-mail \ E-mail  Setup» :


In the configuration section, activate the SMTP service, set SMTP as the default provider of batch messaging and optionally limit the size of attachments.


In the « SMTP Parameter » section, contact your favorite IT specialist to obtain the server address, port, user name and password required for sending :


Once the configuration is done, it is always useful to send a test email to validate that everything is good.

The second step is to start a batch process which will take care of sending emails.

For that, go to the module « System Administration \ Periodic tasks \ Email processing \ Email distributor batch » :


Configure a frequency according to the needs of the company (every hour, 10 minutes, etc.).

We come to the 3rd part, and not the simplest, the creation of a mail template. Which is actually where we are going to define the formatting of our mail.

To create it, it will depend on the scope of the Workflow.

If the Workflow is shared between all the entities, this will be done in the module “System Administration \ Setup \ E-mail \ System email templates” :


If the Workflow is specific to the entity, this will be done in the module “Organization administration \ Setup \ Organization email templates” :


Both bring us to a similar screen in which we have to create a new line:


Email ID : the Template name, who will be choose in the workflow (next step)

Email description : free text to explain the ID (no impact)

Sender Name : name that will appear in the email as the sender

Sender Email: mandatory address but which will be replaced via SMTP

Then create a line for each of the languages used in your company like this :


Choose the language, then enter the subject. The Subject will be the title of the email.

To insert the body of the email, click on “Email message” or on “Edit”:


And there surprise! D365 asks you to load an HTML file …


A little tour on the web to find how to create an html file and here is a simple test:

Use the following link to compose your own html : https://html5-editor.net/


I’m not hiding you that I haven’t yet figured out how to find and assign the variables between the “%” and that it would be a good idea to dig a little deeper into the subject.

The result of this file is the email below:


Did you think you had finished?

Go still a little effort we are in the last straight line…

We just have to associate our Template in our workflow.

To do this, open the workflow and look at the global parameters of the workflow:


Just to clarify, if you have a header workflow that calls a line workflow, the Template can be only configured in the header workflow.

On the other hand if you configure it only at line level it will not work…

And now, your users will now be able to receive their email notifications 

I hope I didn’t give you a headache too much,


What is the primary purpose of using a Solution in Microsoft Power Platform & ALM?

As organizations embrace low-code development with Microsoft Power Platform , it becomes essential to manage and govern apps, flows, and dat...