Monday 31 December 2018

How to increase attachments file size limit in Dynamics 365 Finance and Operations / Ax 7.0

Some times we need to attach files(Excel, CSV,PDC) more than the standard limit. There is a configuration in D365 F&O for increasing or decreasing the size.

Organization administration -> Document management -> Document management parameters


@Rahul

Friday 21 December 2018

Account number for transaction type Purchase expenditure, un-invoiced does not exist error in AX 2012/ D365 Finance & Operations

Hi,

I was getting the below error while trying to receive the purchase order in Ax.

Product master 1000-4567-990 Account number for transaction type Purchase expenditure, un-invoiced does not exist.


Reason: Posting profile for item group is missing from  type Purchase expenditure, un-invoiced

Solution:

  1. Click Inventory management, expand Setup, expand Posting, and then click Posting.
  2.  Click "Purchase tab" - > select "Purchase expenditure, un-invoiced"
  3. Add a new line and add product item group, account type and main account.

Afterwards, reprocess the PO receipt. 

That's it.

For more details please see below post.

@Rahul

Thursday 20 December 2018

Try Catch Exception handling AX 2012/ D365 Finance & Operations X++

The code below contains a try/catch that we use a lot when developing batch jobs, especially multi-threaded ones.

It deals with frequently occurring exceptions that, in some cases, can be easily solved by retrying/continuing:


-> Deadlocks
-> Update conflicts
-> Duplicate key conflicts


#OCCRetryCount
 
    try
    {
        ttsbegin;

        // do stuff here
     
        ttsCommit;
    }
    catch (Exception::Deadlock)
    {
        // retry on deadlock
        retry;
    }
    catch (Exception::UpdateConflict)
    {
        // try to resolve update conflict
        if (appl.ttsLevel() == 0)
        {
            if (xSession::currentRetryCount() >= #RetryNum)
            {
                throw Exception::UpdateConflictNotRecovered;
            }
            else
            {
                retry;
            }
        }
        else
        {
            throw Exception::UpdateConflict;
        }
    }
    catch(Exception::DuplicateKeyException)
    {
        // retry in case of an duplicate key conflict
        if (appl.ttsLevel() == 0)
        {
            if (xSession::currentRetryCount() >= #RetryNum)
            {
                throw Exception::DuplicateKeyExceptionNotRecovered;
            }
            else
            {
                retry;
            }
        }
        else
        {
            throw Exception::DuplicateKeyException;
        }
    }


Please note that retry keyword is retrying the same record again and again. Continue keys word is skip the present record and continue with the next record.

Example: 

while (gQueryRun.next())
        {
            inventJournalTable    = gQueryRun.get(tableNum(inventJournalTable));

            if (inventJournalTable.Posted == NoYes::No)
            {
                JournalCheckPost                journalCheckPost;
                journalCheckPost = InventJournalCheckPost::newPostJournal(inventJournalTable);
                try
                {
                    ttsbegin;
                    if(journalCheckPost.validate())
                    {
                        journalCheckPost.run();
                    }
                    ttscommit;
                }
             
                catch (Exception::Deadlock)
                {
                    continue;
                }
                catch (Exception::Error)
                {
                    continue;
                }
                catch (Exception::Warning)
                {
                    CLRInterop::getLastException();
                    continue;
                }
                catch (Exception::CLRError)
                {
                    CLRInterop::getLastException();
                    continue;
                }
            }
        }

Tuesday 18 December 2018

Manually create and apply deployable packages in AX 7 / dynamics 365 finance and opertaions

An AOT package is a deployment and compilation unit of one or more models that can be applied to a Microsoft Dynamics 365 for Finance and Operations environment, or a Microsoft Dynamics 365 for Retail environment. It includes model metadata, binaries, reports and other associated resources. One or more AOT packages can be packaged into a deployable package, which is the vehicle used for deployment of code (and customizations) on demo, sandbox and production environments. This article guides you through the process of creating and applying a deployable package.

Overview of the process

In order to deploy your code and customizations to a runtime environment (Demo, Sandbox or Production), you must create deployable packages of your solution or implementation. Deployable packages can be created using the Visual Studio dev tools, or by the build automation process that are available on build environments. These deployable packages are referred to as Application Deployable Packages or AOT Deployable Packages. The image below is an overview of the process. Once a deployable package is created, it must be uploaded to the LCS project's asset library. An administrator can then go to the LCS environment page and apply the package to a runtime environment using the Maintain > Apply updates tool.
Create and apply a deployment package
 Note
Application Deployable Packages do not contain source code.

Create a deployable package

After you have completed the development stage, follow these steps to create a deployable package from Visual Studio.
  1. In Microsoft Visual Studio, select Dynamics 365 > Deploy > Create Deployment PackageCreate deployment package
  2. Select the packages that contain your models, and then select a location in which to create the deployable package. Select a location
  3. After a deployable package is created, sign in to Microsoft Dynamics Lifecycle Services (LCS), and then, in your LCS project, click the Asset Library tile.
  4. Upload the deployable package that you created earlier.

Apply a deployable package to Sandbox  environments.

Prerequisite steps

  • Make sure that the package that should be applied is valid. When a package is uploaded to the Asset library, it isn't analyzed. If you select the package, the package status appears in the right pane as Not Validated. A package must pass validation before it can be applied in an environment by using the following procedures. The status of the package will be updated in the Asset library to indicate whether the package is valid. We require validation to help guarantee that production environments aren't affected by packages that don't meet the guidelines.
    There are three types of validations:
    • Basic package format validations
    • Platform version checks
    • Types of packages
  • Make sure that the package is applied in a sandbox environment before it's applied in the production environment. To help guarantee that the production environment is always in a good state, we want to make sure that the package is tested in a sandbox environment before it's applied in the production environment. Therefore, before you request that the package be applied in your production environment, make sure that it has been applied in your sandbox environment by using the automated flows.
  • If you want to apply multiple packages, create a merged package that can be applied first in a sandbox environment and then in the production environment. Application of a single package in an average environment requires about 5 hours of downtime. To avoid additional hours of downtime when you must apply multiple packages, you can create a single combined package that contains one package of each type. If you select a binary package and an application deployable package in the Asset library, a Merge button becomes available on the toolbar. By clicking this button, you can merge the two packages into a single package and therefore reduce the total downtime by half.
  • Make sure that the Application binary update package is applied to your dev/build environment before it is applied to your sandbox and production environment - If the application binary package is applied directly to your Tier 2+ sandbox environment but is not applied on your dev/build environment, the next time you move an AOT package from dev/build box (which does not have the same application binaries as your sandbox environment) to sandbox, some of the application binaries will be overwritten with what is in your dev/build environment. This could result in a regression of the version of your sandbox environment.
Before you begin, verify that the deployable package has been uploaded to the Asset library in LCS.
  1. For a binary update, upload the package directly to the Asset library. For information about how to download an update from LCS, see Download updates from Lifecycle Services.
    For an application (AOT) deployable package that results from an X++ hotfix, or from application customizations and extensions, create the deployable package in your development or build environment, and then upload it to the Asset library.
  2. Open the Environment details view for the environment where you want to apply the package.
  3. Click Maintain > Apply updates to apply an update.
  4. Select the package to apply. Use the filter at the top to find your package.
  5. Click Apply. Notice that the status in the upper-right corner of the Environment details view changes to Queued, and that an Environment updates section now shows the progress of the package.
    Queued status
  6. Refresh the page to see the progress of the package application. Notice that the servicing status is In Progress, and that the environment status is Servicing.
    Servicing status
  7. Continue to refresh the page to see the status updates for the package application request. When the package has been applied, the environment status changes to Deployed, and the servicing status changes to Completed.
    Deployed status
  8. To sign off on package application, click Sign off if there are no issues. If issues occurred when you applied the package, click Sign off with issues.

Troubleshooting

General troubleshooting/diagnostics

If package application isn't successful, you can download either the logs or the runbook to see the detailed logs. You can also use RDP to connect to an environment so that you can fix issues. If you must report the issue to Microsoft, be sure to include the activity ID that is reported in the Environment updates section.
Download log and Download runbook buttons
Troubleshooting

Using the logs

  1. Download the logs.
  2. Unzip the log files.
  3. Select the role that a step failed for, such as AOS or BI.
  4. Select the VM where the step failed. This information appears in the Machine name column in the Environment updatessection.
  5. In the logs for the VM, select the folder that corresponds to the step where the issue occurred. The folder name identifies the step that each folder corresponds to. For example, if the issue occurred in the executing of a step, select the ExecuteRunbookfolder.
    For example, if the folder name is ExecuteRunbook-b0c5c413-dae3-4a7a-a0c4-d558614f7e98-1_I0_R0, the step number is highlighted and is the number after the globally unique identifier (GUID).

Package failure

If package application isn't successful, you have two options:
  • Click Resume to retry the operation that failed.
    Failed status
  • Click Abort to stop package application.
     Note
    If you click Abort, you don't roll back the changes that have already been made to your environment. To proceed, you must fix the issue.
    Message box that appears when you abort package application

Apply a package to a production environment by using LCS

n a production environment, unlike in a sandbox environment or other types of environments, package application through LCS isn't self-serve. Customers and partners must submit a request to Microsoft to apply a package when the customer is ready for the downtime.
  1. Download an update from LCS. For information about how to download an update from LCS, see Download updates from Lifecycle Services.
    • For a binary update, upload the update deployable package directly to the Asset library.
    • For an application/X++ update, apply the package in a development environment. After you resolve any conflicts, generate a deployable package from Visual Studio, and upload the package to the Asset library. For information about how to upload to the Asset library and create a deployable package, see Create deployable packages of models.
  2. On the Asset library page in LCS, on the tab that corresponds to the asset type (Software deployable package), select a package, and then click Release candidate.
  3. Apply the package in a sandbox environment by using the instructions earlier in this topic.
  4. After the package is successfully applied and signed off in the sandbox environment, open the Asset Library, and mark the package as Release Candidate.
  5. Open the Environment details view for the production environment where you want to apply the package.
  6. Click Maintain > Apply updates to apply the package.
  7. Select the type of package to apply.
  8. Select the package to apply in your production environment, and then click Schedule to submit a request to apply it.
     Note
    The list of packages includes only the packages that have been successfully signed off in the sandbox environment, and that have been marked as release candidates.
  9. Specify the date and time to schedule package application for, click Submit, and then click OK to confirm. Note that your environments will be down and unavailable to perform business while the package is being applied.
  10. Refresh the page. Two fields on the page indicate the status of the request.
    • Request status – This field indicates the status of the request that you submitted to Microsoft.
    • Actionable by – This field indicates who must take action.
    Request status and Actionable by fields
  11. Microsoft either accepts or denies the request.
    • If the request is accepted, Microsoft begins to update the environment.
    Accepted request: Request status = Request accepted, Actionable by = Microsoft
    • If the request is denied, Microsoft informs the customer about the reason for denial and the action that the customer must take. The customer can then reschedule the request, change the package, or cancel the request.
    Denied request: Request status = Request denied, Actionable by = Customer/Partner
    At any time, the customer can use the Comments field to post comments to the request.
    Example of comments that are posted to a request
  12. After the environment is serviced, you can monitor the status. The Servicing status field indicates the status of package application.
    Servicing status and Request status fields
    Additionally, a progress indicator shows the number of steps that have been run, out of the total number of steps that are available.
    Progress indicator

Successful package application

  • After the deployment is successfully completed, the Servicing status field is set to Completed, but the Request status field is still set to In progress because the request hasn't yet been closed.
    Successful deployment: Servicing status = Completed, Request status = In progress
  • After Microsoft has finished applying the request, you must close the request by clicking Close servicing request.
  • When you close a successful request, in the Edit work item details dialog box, set the Service request status field to Succeeded, and then click Submit.

Unsuccessful package application

  • If package application isn't successfully completed, Microsoft will investigate the issue. The Servicing status field will indicate that package application has failed.
    Unsuccessful package deployment: Servicing status = Failed
  • When deployment fails, Microsoft can abort the package, revert the environment to a good state, and send the request back to the customer, so that the customer can validate the environment and close the request. If there is an issue in the package, the customer must submit a new request that includes the new package.
    Comment from Microsoft that changes were reverted, and that the customer must validate the environment
  • When you close a failed request, in the Edit work item details dialog box, set the Service request status field to Aborted.

For more details please refer below post.

Self-service deployment / New environment deployment time duration in D365 Finance and Operations

Self-service deployment is available for Dynamics 365 for Finance and Operations cloud environments. Self-service deployment enables easier deployment and significantly reduced deployment times.

What’s new or changed

Customers using the self-service capabilities will see the following changes in their LCS experience.
  • Deployment is self-service and can be completed within an average time of 30 minutes. There are no longer lead times and wait times for deployment. You can control when you deploy, and verify that the environment is deployed. This experience is the same as the current experience.
    Deployment settings
  • You will no longer have remote desktop access to the Tier 2+ sandbox environments. All operations that need remote desktop access are now available as self-service actions. The following image shows some of the operations in the environment’s Maintain > Move database menu option.
    Self-service actions
  • The diagnostics capabilities will remain the same, which enables troubleshooting without remote desktop access.
    Environment monitoring
  • You will not have SQL Server access on Tier 2+. You will continue to have SQL database access using just-in-time access.
  • You will need to provide a combined deployable package for customizations. Delta packages will not be supported. This was always a recommended best practice and is now enforced.

For more details please refer below post
https://docs.microsoft.com/en-us/dynamics365/unified-operations/dev-itpro/deployment/infrastructure-stack

Friday 14 December 2018

Rest API GET call JSON format using basic authentication in Dynamics 365 F&O / AX 7.0

In this post I'll be showing you how to send a GET call from dynamics 365 F&O system and the return format is in JSON.

Created a simple x++ job below. Please change according to your requirement.


class TestExternalCall_GET_JSON
{     
    /// <summary>
    /// Runs the class with the specified arguments.
    /// </summary>
    /// <param name = "_args">The specified arguments.</param>
    public static void main(Args _args)
    { 
     
        int                                                      find;
        str                                                      url,aosUri,activeDirectoryTenant;
        str                                                      activeDirectoryClientAppId;
        str                                                      activeDirectoryClientAppSecret;
        str                                                      postData,activeDirectoryResource;
        str                                                      aadClientAppSecret,oAuthHeader;
        str                                                      returnValue,jsonString,jsondszstr;
        System.Net.HttpWebRequest           request;
        System.Net.HttpWebResponse         response;
        System.Byte[]                                   byteArray;
        System.IO.Stream                             dataStream;
        System.IO.StreamReader                 streamRead;
        System.IO.StreamWriter                  streamWrite;
        System.Net.ServicePoint                  servicePoint;
        System.Net.ServicePointManager    servicePointmgr;
        System.Net.HttpVersion                   version;
        CLRObject                                        clrObj;
        Newtonsoft.Json.JsonReader            reader;
        System.Text.Encoding                      utf8;
        Counter                                             countCounter;
        Object                                               obj;
        Map                                                  data;
        System.Byte[]                   byteArraynew;

        System.Net.WebHeaderCollection headers = new System.Net.WebHeaderCollection();
     
        str  byteStr = strfmt('%1:%2', "USERNAME", "PASSWORD");
     
        new InteropPermission(InteropKind::ClrInterop).assert();

        headers = new System.Net.WebHeaderCollection();
     
        url = "Paste endpoint URL here";
     
        clrObj = System.Net.WebRequest::Create(url);
   
   
        request = clrObj;
        request.set_Method("GET");
        request.set_KeepAlive(true);
   
        request.set_ContentType("application/json");
        utf8    = System.Text.Encoding::get_UTF8();
        byteArraynew   = utf8.GetBytes(byteStr);
        byteStr     = System.Convert::ToBase64String(byteArraynew);

        headers.Add("Authorization", 'Basic ' + byteStr);
        request.set_Headers(headers);

        servicePoint = request.get_ServicePoint();

        System.Net.ServicePointManager::set_Expect100Continue(false);

        System.Net.ServicePointManager::set_SecurityProtocol(System.Net.SecurityProtocolType::Tls12);


        response = request.GetResponse();

   
        dataStream = response.GetResponseStream();


        streamRead = new System.IO.StreamReader(dataStream);

        jsonString = streamRead.ReadToEnd();

        info(strFmt("%1",jsonString));

        dataStream.Close();

        response.Close();
    }

}

In my next post I'll show you how to use OAUTH in GET call instead of normal authorization.
@Rahul

Security Development Tool in AX 7 / Dynamics 365 F&O

The Security Development Tool is a feature developed initially for AX 2012 that helps to more easily create and maintain security artifacts such as roles, duties, and privileges. Technically this is still a beta tool offered by Microsoft through Life Cycle Services which provides the following features:
  1. Displays entry point permissions for a given role, duty, or privilege
  2. Provides the ability to record business process flows and identify the entry points that are used
  3. Allows for testing a newly created or modified security role, duty, or privilege without having to use a test user account

It is an extremely helpful tool that Security Administrators of AX can use during the development of user security. In Dynamics for 365 Enterprise though, the Security Development Tool doesn’t exist as a separate application but instead its features are implemented directly in the application itself.
Here’s a breakdown of where the features of the Security Development Tool now live in Dynamics 365 Enterprise:
  • Full hierarchy view of role, duty, privilege, entry point security assignments
    • On the System Administration -> Security Configuration page if you select a role and choose View Permissions
    • You will then be presented with a report that shows an overview of the role, duty, privilege, and entry point assignment 
    • You can also follow this process to get the same information at a duty and privilege level
  • Breakdown of the roles, duties, and privileges that have access a particular page/form in Dynamics 365 Enterprise
    • On a particular record or form go to Options -> In the Page Options section -> Select Security Diagnostics
    • A Security Diagnostics window will open and show the roles, duties, and privileges that have access to this page/form
  • Record a task/process
    • To start recording a process go to gear in the menu bar and click on Task Recorder
    • Give the recording a name and description
    • Navigate the steps required to complete the task, each step will be recorded in the right hand pane
    • When you are done, click the Stop button in the top menu bar and you will be presented with options to save the task steps in a number of ways
To help with the process of figuring out which menu items are used during the task, I have created a tool to help parse out a Developer’s Recording, it is available on my GitHub and a screenshot is below.
UPDATE:
Dynamics 365 Enterprise has now added an easy way to parse the task recordings to get the menu item data from it. In the system administration module, under the Security heading you will find an entry for ‘Security diagnostics for task recordings’.
If you click on that you will be presented with a couple options, with the Open from this PC option you can upload previously downloaded task recording XML files, you can also open any saved task recording from LCS.
Once the file is processed, you will be presented with a screen with very similar output from the utility I wrote. It will show you the label name, AOT name, and type of each menu item found in the task recording. One really cool feature, is that you can select a user from the User ID drop down and the system will tell you whether that user currently has the necessary permissions. In the example below, you can see that this user is missing the necessary permissions to perform this process.

Create Security Roles in AX 7 / Dynamics 365 Finance and Operations

Dynamics 365 continues to use user role based security, similar to that in Dynamics AX 2012, which follows the basis that permissions are not granted to the user, but to the security roles assigned to a given user.
Without a role or roles, a user will not be able to access or use Dynamics 365. Roles are built upon duties and privileges which determine the business process and access level for a given role, respectively.  Below is a diagram of the connection between the different elements to role-based security.
While the functionality remains the same, there are two new features that make the process easier to understand and create the various parts of the security architecture – the security diagnostic and security configuration tools. These tools have been extremely helpful while configuring custom security roles on a recent Dynamics 365 project.

Security Diagnostic Tool

In previous versions of Dynamics AX, a project team would need to install the Security Development Toolset in an environment to more easily determine the roles, duties and privileges needed to complete a given task. Now, in Dynamics 365, users with a security administrator or system administrator role are able to run the Security Diagnostic Tool on any form to find out the roles, duties and privileges necessary to complete a task. Personally, I have used the Security Diagnostic Tool as my starting point for building out custom roles within Dynamics.
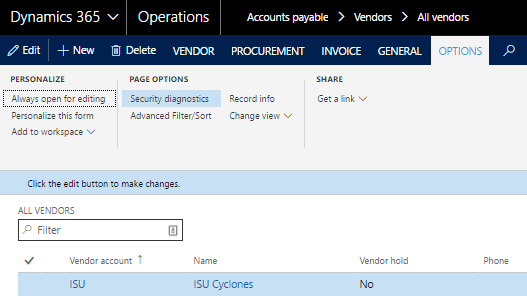
To access the Security Diagnostic Tool a user can select Option tab > Page Options > Security Diagnostics on any form and it will run automatically.
 
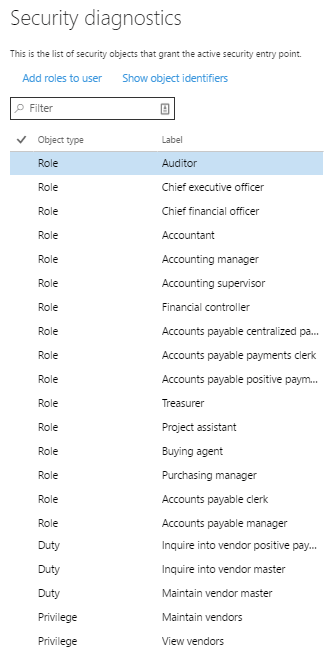
Once run, the tool will list all the roles, duties and privileges associated with that form. Users are also able to select Object Identifiers to expose the AOT tables/field names associated with the object.
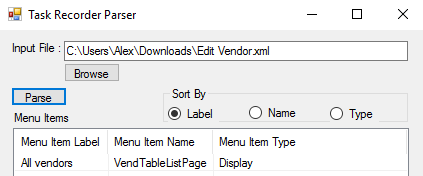
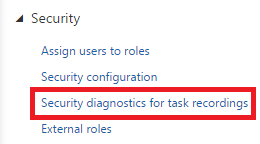
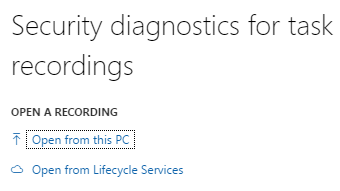
Alternatively, if you would like to run the Security Diagnostic Tool for an end to end process, you can use the Security Diagnostics to Task Recordings Functionality. Users can access this through System Administration > Security > Security diagnostics for task recordings. Once selected, you will be prompted to open the task recording from PC or Lifecycle Services.
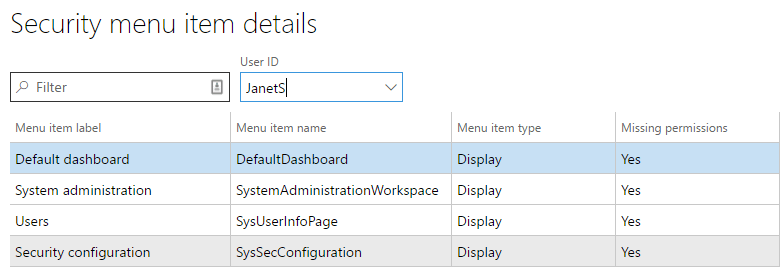
Once uploaded, the all menu item access in the task recording will populate. You can then select a user from the User ID dropdown to see whether or not they currently have permissions to access those menu items.
The one downfall of the Security Diagnostic toolset is that you are unable to see which role is associated with the desired duties/privileges. Once I have identified the desired duty/privilege, I will go into the second new toolset, the Security Configuration tool, to find out which roles currently have them.

Security Configuration Tool

In previous versions of Dynamics AX, the Security Development Tool, as well as the Security Roles form, were used to test and explore roles, duties and privileges. These tools have been replaced with a single tool, the Security Configuration tool, which allows users to explore security roles and allows for security roles to be created and modified within the user interface.
This toolset is extremely users friendly and intuitive; however, it must be mentioned that if changes are made within the user interface, they are not done in the AOT. This means that these changes are not permanent and can be removed via the user interface and/or an environment refresh. Instead, changes are saved as a data export file that can be imported and published into the desired environments.
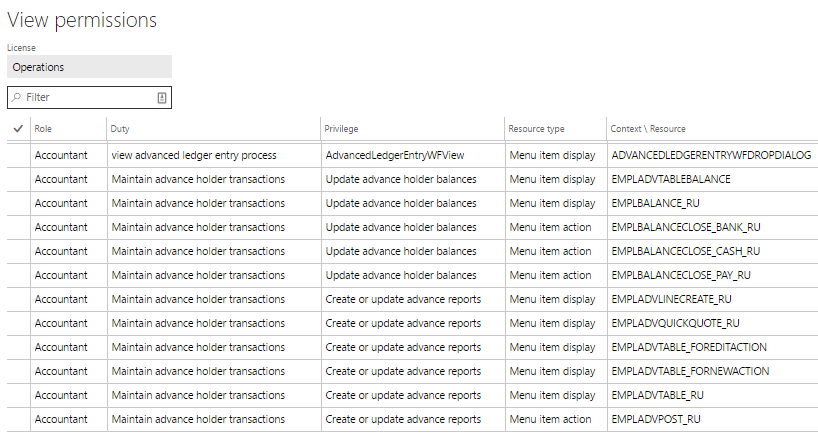
Users are able to click through and get more granular with the different pieces related to a role, duty or privilege. As mentioned in the previous section, I typically use the Security Diagnostic Tool to determine the desired duty. Once I have the duty, I’ll open the Security Configuration Tool, select the Duties tab and paste the duty name into the filter. Users are then able to explore the associated privileges for the duty, and what roles currently have the duty assigned to it.
In addition to exploring out-of-the-box security components, users are able to create custom roles within the user interface. The below section explores the creation of a new role within the Security Configuration Tool.
  1. Navigate to System Administration > Security > Security Configuration
  1. With the ‘Roles’ tab selected, click ‘Create new’ this will allow you to create a brand new role within Dynamics. Note: users are also able to ‘Duplicate’ existing roles
  1. Enter the name of the new role. Note: it is recommended to use a different naming convention with new roles so that they are easily identifiable
  1. The role will be created, however, it will have no duties or privileges. To add a duty to the role, ensure the new role is highlighted and select ‘Duties’ in the second column. Note: the ‘We didn’t find anything to show here’ message is acknowledging that there is currently no duties associated with this role
  2. Once selected click Add references
  1. All the out of the box duties (OOTB) (and custom if created) will be available in the list. Select one or more duty and they will become available on the role, as well as that duties respective privileges
  1. Similar to adding references, users can remove references if they are not desired/required. Note: privileges should never be removed from an OOTB duty, as it will be removed from all roles that have that duty. Instead, the duty should be duplicated and added to the role, then the privilege as well as the OOTB duty can be removed from the role
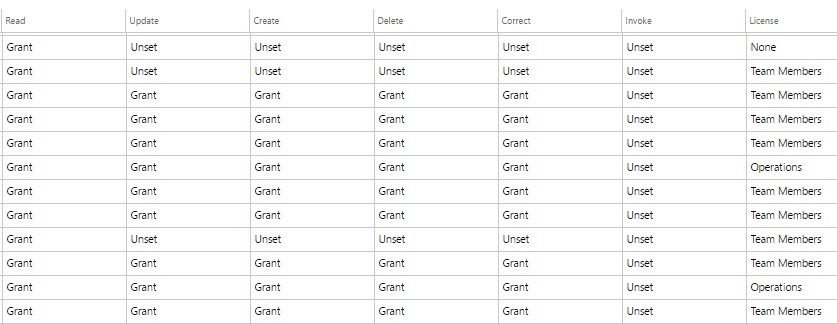
  1. As updates are made in the Security Configuration Tool, the number of unpublished objects will grow. Before each change is available it must be published. Once published, the custom security roles can be exported from the current environment and import to any other environment. Once the file is imported the data entities must be published. Below is a screenshot of what the data export file looks like with the custom roles

Adding a newline into a string in C# and X++

Below is the sample code we can use for  adding a newline after every occurrence of "@" symbol in the string in C#   using System...