In older versions of AX, We used right-click context menus (shortcut menus) by using the PopupMenu class
But in the current version, this can be achieved by using ContextMenu API and by overriding 2 methods getContextMenuOptions(), to add options to the context menu and selectedMenuOption() to process the user’s selection
Lets create a new form as shown below by name SRContextMenu. I have added CustGroup Table as a dataSource and in the design I have added CustGroup control to the grid.
Lets see the coding part to achieve this now. Override the classDeclaration method of the form/element and add the below line of code
[Form]
public class SRContextMenu extends FormRun
{
public const int rootIdx = 1;
}
Then override the getContextMenuOptions method as shown below from the CustGroup control
Add the below lines of code in the method. In the below example, I am adding a new new context menu option with the label – “Get customer balance(s )”
[Control("String")]
class CustGroup_CustGroup
{
public str getContextMenuOptions()
{
str ret;
ContextMenu menu = new ContextMenu();
ContextMenuOption option = ContextMenuOption::Create("Get customer balance(s)", rootIdx);
List menuOptions = new List(Types::Class);
// Add label and ID of menu option
menuOptions.addEnd(option);
menu.ContextMenuOptions(menuOptions);
return menu.Serialize();
}
}
Next override the selectedMenuOption() method as shown below from the CustGroup control
Add the below lines of code to Process the user selection from the context menu
// Define new override on the control for processing the user selection
public void selectedMenuOption(int selectedOption)
{
CustTable custTable;
AmountCur balanceAmt;
switch (selectedOption)
{
case –1:
break;
case rootIdx:
while select CustTable where CustTable.CustGroup == CustGroup.CustGroup
{
balanceAmt += CustTable.balanceMST();
}
info(strFmt("%1", balanceAmt));
break;
default:
break;
}
}
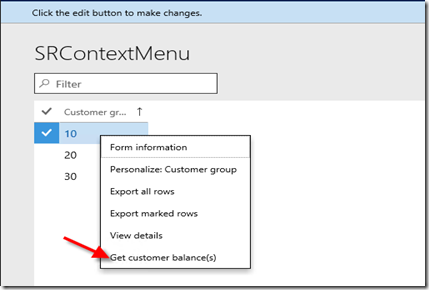
Now, lets open the form and see the newly added Context menu option. Right click on the customer group control in the grid and you will find our newly created option as shown below.
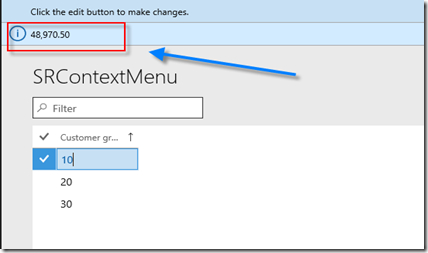
Double click on the option and it will process the context menu option. In this example, I am showing all the customer balances of that particular customer group in the Infolog
Some guidelines before using context menus
- The most important commands should be at the top of the menu.
- Remove commands that don’t apply to the current state of the element that is the target of the right-click.
- Right-click is a shortcut. Therefore, the commands on the context menu should always be available in other places on the page.
- Don’t create submenus of context menus. Submenus are hard to use and aren’t touch-friendly.
- Limit the number of menu items to five.


No comments:
Post a Comment