Monday, June 15, 2015

Import Unit Of Conversions Data - Ax 2012

Hello Guys...!

Here I'm sharing code for importing Unit Of Conversions in Ax 2012.


Step 1: Copy and Paste below code  in Job (AOT->Job)


 static void Rahul_UnifOfConversion_Import(Args _args)
{
    CommaIO                     csvFile;
    container                   readCon;
    counter                     icount,inserted;
    Dialog                      dialog;
    DialogField                 dfFileName;
    FileName                    fileName;
    str                         transDate;
    str                         _fromUnitOfMeasure, _toUnitOfMeasure, _product;
    real                        _factor, _innerOffset, _outerOffset;
    int                         _numerator,_denominator;
    str                         _rounding;
    UnitOfMeasureConversion     unitOfMeasureConversion, UnitOfMeasureConversionLocal;
    UnitOfMeasureConversionRounding UnitOfMeasureConversionRounding;
    inserted =0;
    //
    #File
    dialog     = new Dialog("Pick the file");
    dfFileName = dialog.addField(extendedTypeStr(FileNameOpen));
    dialog.filenameLookupFilter(["All files", #AllFiles]);
    if(dialog.run())
      {
         filename =  dfFileName.value();
      }
         csvFile  =  new CommaIO(filename,'r');
    if(csvFile)
      {
        ttsBegin;
        while (csvFile.status() == IO_Status::OK)
        {
          readCon  = csvFile.read();
          if(readCon)
            {
                _fromUnitOfMeasure = conPeek(readCon,1);
                _toUnitOfMeasure = conPeek(readCon,2);
                _product = conPeek(readCon,3);
                _factor = conPeek(readCon,4);
                _numerator = conPeek(readCon,5);
                _denominator = conPeek(readCon,6);
                _innerOffset = conPeek(readCon,7);
                _outerOffset = conPeek(readCon,8);
                _rounding = conPeek(readCon,9);
                unitOfMeasureConversion.FromUnitOfMeasure   = UnitOfMeasure::findBySymbol(_fromUnitOfMeasure).RecId;
                unitOfMeasureConversion.ToUnitOfMeasure     = UnitOfMeasure::findBySymbol(_toUnitOfMeasure).RecId;
                unitOfMeasureConversion.Product             = EcoResProduct::findByDisplayProductNumber(_product).RecId;
                unitOfMeasureConversion.Factor              = _factor;
                unitOfMeasureConversion.Numerator           = _numerator;
                unitOfMeasureConversion.Denominator         = _denominator;
                unitOfMeasureConversion.InnerOffset         = _innerOffset;
                unitOfMeasureConversion.OuterOffset         = _outerOffset;
                unitOfMeasureConversion.Rounding            =  str2enum(UnitOfMeasureConversionRounding ,_rounding);
                UnitOfMeasureConversionLocal.RecId = UnitOfMeasureConversion::findByConversion(unitOfMeasureConversion.FromUnitOfMeasure,
                                                                                         unitOfMeasureConversion.ToUnitOfMeasure).RecId;
                if(UnitOfMeasureConversionLocal.RecId == 0)
                {
                    unitOfMeasureConversion.insert();
                    inserted++;
                    icount++;
                }
               }
            }
          ttsCommit;
      }
    info(strFmt("%1 records has been imported out of %2", inserted, icount));
}

Step 2 : Fill data in excel sheet in the below order and save in csv format.(Delete Header lines)

                 fromUnitOfMeasure
                _toUnitOfMeasure
                _product
                _factor
                _numerator
                _denominator
                _innerOffset
                _outerOffset
                _rounding
Step 3 :Run the job and browse csv file and press ok.. That's it


@Rahul Talasila
Sunday, June 14, 2015

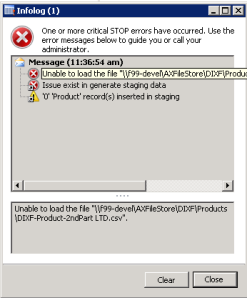
Issue exist in generate staging data In Data Migration Framework - Ax 2012 R3

Hello Guys..!

Error : While loading data to staging table getting below error ..

blog20131031a


Reason :  File name  contains space.


Solution : Give file name without space.


@Rahul Talasila
 

Access Is denied For the user Error In Data Migration Framework - AX 2012 R3

Hello Guys..!

Error : while validating DMF sharing folder getting below error


   " Access Is denied For the user"

Solution :

-> Add the Data Import/Export Framework service account to the Microsoft Dynamics AX Data Import Export Framework Service Users local group on the computer that is running the Data Import/Export Framework service. Then restart that computer.

Note : For more information about how to add a service account to a group, see Add a member to a local group.

-> Add the AOS service account to the Microsoft Dynamics AX Data Import Export Framework Service Users local group on the computer that is running the AOS instance. Then restart that computer.


@Rahul Talasila


Monday, June 8, 2015

The value is not found in the map in Purchase Invoice - AX 2012

Hello Guys ..!

Some times we get below error while opening proforma invoice/invoice in Accounts payable

Error :

the value is not found in the map.

Reason:

This problem comes when we open pro forma/ invoice multiple times , system will keep this  into waiting stage.
 
Solution :

Step 1 :  AP->Inquiries->History->Invoice history and matching details (Click on this)
Step 2 : Give the purchase order number and filter records
Steps 3 : delete the record if field name “Job status”   is in “Waiting”.


@Rahul Talasila

Wednesday, May 20, 2015

Vendor return / Return purchase order in AX 2012

Hello Guys..!

Here I'm sharing steps how to do Vendor return / Return purchase order in AX 2012


Create a return purchase order.

 Return order is created in reference to specific purchase order and it should be authorized by vendor i.e. vendor should provide RMA number which indicates the permit for return of goods to vendor. 

Requirement

Purchase order should already be created and invoiced in order to create a return order for it.

Background

Let's assume that the inventory manager accidently found some items are damaged. He notifies the purchasing manager about the issue. Purchasing manager decides to return the damaged items to the vendor. Purchasing manager creates a return purchase order to facilitate return of goods to vendor.


Steps to create return purchase order

1. Go to Account payable --> Common --> Purchase orders --> All purchase orders.


2. Click on Purchase order button to create new purchase order.


3. Enter: 

   a. Vendor account number: It is the same vendor to whom we are returning goods.

   b. Purchase type:Select purchase type as "Returned order".

  c. RMA number: As soon as we select purchase type as returned order, we can see RMA number field appears in the form. Enter the RMA number received from the vendor which permits the return of goods to vendor. 

  d. Enter other details as per requirement.

4. Click ok to create purchase order.


5. Now we need to add lines in the order which we can do it manually or with the help of credit note.

 Add lines through Credit note

6. Go to Purchase order form-->click on purchase order lines--> Click on credit note 

    or 

    Go to purchase order form-->go to purchase fast tab--> click on credit note.


7. Select the appropriate purchase orders and their lines. 

Note: We can select multiple purchase orders and their specific lines to get them in return purchase order. Purchase orders specific to vendor selected in the return purchase order can only be seen in credit note form.

8. Click ok to get the lines in return purchase order.


9.Here you can see line in the return purchase order with negative quantity.

Confirmation

10. Post the Return purchase order confirmation after verifying all the details.


 Receipt list


11. Post the receipt list for the items in the return purchase order.


12.The status of the inventory transactions goes to Physical reserved i.e. items will get physically reserved in the warehouse to get it picked for return.


 Picking

13.Unfortunately, it is impossible to create a picking task for a purchase order line (or for an output order that can be created for the purchase order line). So, we cannot use the Picking form (Inventory management > Common Forms > Picking routes). We assume that the Purchase Manager calls the Warehouse Worker and asks him to perform the picking task: pick the broken items from a specific location, transfer the broken items to the outbound location, and inform the Purchase Manager about the operation being completed. The Warehouse Worker receives this in an informal form from the Purchase Manager, because we can't create the picking instruction document in Microsoft Dynamics AX for the returned items. When the Warehouse Worker completes the picking task and informs the Purchase Manager, she or he does the following: in the lines area of the Purchase order form, click the Update line --> Pick button.


14. Click on Add picking list update button to get the items available for picking list update.


15. Click on Register all to update the picked item in the system.


16.Once done,Issue status goes to "Picked".


17. We can see inventory transactions status is updated from "Reserved physical" to "Picked".

 Product Receipt

18,We assume that the items are loaded to the truck and delivered to the vendor. When the items are delivered, the Purchase Manager posts, prints, and sends the Packing slip document for the vendor to sign. The Packing slip document is a guarantee that the vendor receives the broken items.

19. Go to purchase order --> Receive fast tab--> Click on product receipt.

20. Enter the product receipt number.


 21.Click ok to post the product receipt which is then send for the vendor to sign. 

22. Once done, we can see inventory transactions status is updated from "Picked" to "Deducted" as the items are deducted from the warehouse.


Invoice

23.The Purchase Manager posts, prints, and sends the invoice document for the vendor to sign. This document confirms that the vendor must pay (return) some amount of money for the broken items.

24. Go to purchase order -->Invoice tab--> Click on Invoice button to post the invoice for the order.


25. Enter the invoice number and click on Post button to post the invoice for the order.

26. Once done, invoice will send to vendor for signature. It confirms that the vendor must pay for broken items.

27. Go to inventory--> Transactions-->The status is updated from "Deducted" to "Sold"


 Note:The invoice document which is generated has the title "Credit note". To view the credit note report, go to purchase order form-->go to Invoice tab--> Click on invoice journal-->click on Preview/Print -->Click on original preview/Copy preview.


In this way, we can create a Vendor return / Return purchase order in AX 2012.


@Rahul Talasila

What is the primary purpose of using a Solution in Microsoft Power Platform & ALM?

As organizations embrace low-code development with Microsoft Power Platform , it becomes essential to manage and govern apps, flows, and dat...