Monday 29 October 2018

display/show the inventory dimensions as parameters on SSRS reports in Dynamics 365 F&O / AX 7

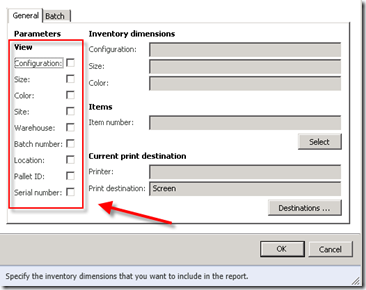
All the inventory dimensions are available to be selected on report parameters below. You will see this view in almost all inventory reports and other module reports.
image
Well, Let me explain how to achieve this and retrieve the values in the data provider class
Its very simple, we need to make use of the contract class for this inventory dimensions view.
Standard has got a InventDimViewContract class with all the parm inventory dimensions methods and we can use these methods later in the DP classes for the selected inventory dimensions by the user on the report parameters screen.
Create an Object for InventDimViewContract in your contract class as shown below [Please note: I am using ProdPickListContract] as an example below
image
Then add a new parm method to the contract as shown below.
[DataMemberAttribute(‘InventDimViewContract’)]
public InventDimViewContract parmInventDimViewContract(InventDimViewContract _inventDimViewContract = inventDimViewContract)
   
    inventDimViewContract = _inventDimViewContract;
    return inventDimViewContract;
}
That’s it, by adding the above discussed,we will get the inventory dimensions on the parameters screen.
Now, the question is how do we get the selected dimensions from the user. Its simple again.
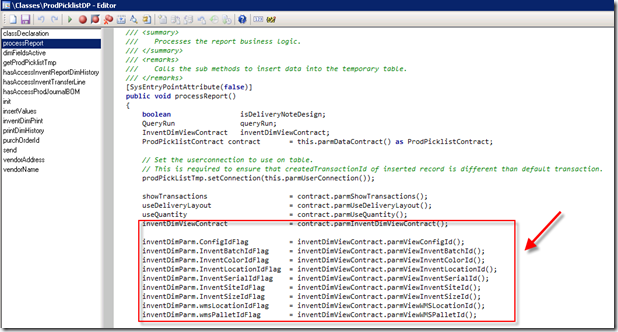
In your data provider class, mainly in processReport method, get the object of the contract class and call the parmInventDimViewContract() method, this object will help you to retrieve the inventory dimensions selected by the user by using parm methods in it. [Example : ParmViewConfigId(), parmViewInventBatchId() etc]. Please refer to screen shot below.
image
You can use these selected inventory dimensions values based on your requirements. The above screen shot is just an example of retrieving the values.
How to read data from Excel using X++ Code in D365 F&O / AX 7

Below is the code snippet which will be handy to read the data from excel using code in D365/ax 7
Please note that, in D365 SysExcel* classes have been deprecated.
Under your references node in solution explorer, add Microsoft.Office.InterOp.Excel reference
Use OfficeOpenXML namespace to achieve this. Improvise the below snippet based on your need.
using System.IO;
using OfficeOpenXml;
using OfficeOpenXml.ExcelPackage;
using OfficeOpenXml.ExcelRange;

class SRReadFromExcel_D365
{       
    public static void main(Args _args)
    { 
        System.IO.Stream            stream;
        ExcelSpreadsheetName        sheeet;
        FileUploadBuild             fileUpload;
        DialogGroup                 dlgUploadGroup;
        FileUploadBuild             fileUploadBuild;
        FormBuildControl            formBuildControl;
        Dialog                      dialog = new Dialog(“Import the data from Excel”);

        dlgUploadGroup          = dialog.addGroup(“@SYS54759”);
        formBuildControl        = dialog.formBuildDesign().control(dlgUploadGroup.name());
        fileUploadBuild         = formBuildControl.addControlEx(classstr(FileUpload), ‘Upload’);
        fileUploadBuild.style(FileUploadStyle::MinimalWithFilename);
        fileUploadBuild.fileTypesAccepted(‘.xlsx’);

        if (dialog.run() && dialog.closedOk())
        {
            FileUpload fileUploadControl     = dialog.formRun().control(dialog.formRun().controlId(‘Upload’));
            FileUploadTemporaryStorageResult fileUploadResult = fileUploadControl.getFileUploadResult();

            if (fileUploadResult != null && fileUploadResult.getUploadStatus())
            {
                stream = fileUploadResult.openResult();
                using (ExcelPackage Package = new ExcelPackage(stream))
                {
                    int                         rowCount, i;
                    Package.Load(stream);
                    ExcelWorksheet  worksheet   = package.get_Workbook().get_Worksheets().get_Item(1);
                    OfficeOpenXml.ExcelRange    range       = worksheet.Cells;
                    rowCount                  = worksheet.Dimension.End.Row – worksheet.Dimension.Start.Row + 1;

                    for (i = 2; i<= rowCount; i++)
                    {
                        info(range.get_Item(i, 1).value);
                        info(range.get_Item(i, 2).value);
                    }
                }
            }
            else
            {
                error(“Error here”);
            }

        }
    }

}

Export data into Excel using X++ code in D365 F&O / AX 7

Below is the quick code snippet to export the data to excel/create an excel in AX 7/D365 for operations
Please note, in D365 we can achieve this through OfficeOpenXml namespace
Improvise it based on your requirement
using System.IO;
using OfficeOpenXml;
using OfficeOpenXml.Style;
using OfficeOpenXml.Table;
class SRWriteToExcel
{
    public static void main(Args _args)
    {
        CustTable custTable;
        MemoryStream memoryStream = new MemoryStream();

        using (var package = new ExcelPackage(memoryStream))
        {
            var currentRow = 1;

            var worksheets = package.get_Workbook().get_Worksheets();
            var CustTableWorksheet = worksheets.Add("Export");
            var cells = CustTableWorksheet.get_Cells();
            OfficeOpenXml.ExcelRange cell = cells.get_Item(currentRow, 1);
            System.String value = "Account Number";
            cell.set_Value(value);
            cell = null;
            value = "Currency";
            cell = cells.get_Item(currentRow, 2);
            cell.set_Value(value);

            while select CustTable
            {
                currentRow ++;
                cell = null;

                cell = cells.get_Item(currentRow, 1);
                cell.set_Value(CustTable.AccountNum);
                cell = null;

                cell = cells.get_Item(currentRow, 2);
                cell.set_Value(CustTable.Currency);
            }
            package.Save();
            file::SendFileToUser(memoryStream, ‘Test’);
           
        }
       
    }

}

Sending Email using X++ Code in D365 F&O/ AX 7

I was just researching on the emailing capabilities in D365 and found that SysINetMail, SysMailer and some of the smmOutlook classes are deprecated because these classes used predominantly client-side technologies that are no longer available
Below is the quick code snippet that can be used in D365 to send emails. Please note, this is just a untested sample code, with out any setups configured. please ensure all setups are done and improvise the code accordingly.
SysMailerFactory class internally used SysImailer* classes to send emails.
class SRSendEmail_D365
{       
    public static void main(Args _args)
    {  
        SysMailerMessageBuilder messageBuilder = new SysMailerMessageBuilder();
        Email   toEmail;
        Email   fromEmail;
         
        try
        {
            FromEmail = "fromemail@xyzcompany.com";
            toEmail   = "oemail@xyzcompany.com";

            messageBuilder.setBody("Hello from D365"false);
            messageBuilder.setSubject("Email Test from D365");
            messageBuilder.addTo(toEmail);
            // Note: not calling setFrom() defaults to the current user for SMTP client, whereas
            // when sent to Outlook any setFrom() value will be ignored since profiles on the client are used
            messageBuilder.setFrom(fromEmail);

            // Open the generated email in the configured client
            // Sends a message interactively, allowing the user to view and modify the message before
            SysMailerFactory::sendInteractive(messageBuilder.getMessage());
            // Try using sendNonInteractive method too
        }
        catch (Exception::Error)
        {
            throw error("@SYS33567");
        }
    }

}

Context Menus in D365 F&O

In older versions of AX, We used right-click context menus (shortcut menus) by using the PopupMenu class
But in the current version, this can be achieved by using ContextMenu API and by overriding 2 methods getContextMenuOptions(), to add options to the context menu and selectedMenuOption() to process the user’s selection
Lets create a new form as shown below by name SRContextMenu. I have added CustGroup Table as a dataSource and in the design I have added CustGroup control to the grid.

image
Lets see the coding part to achieve this now. Override the classDeclaration method of the form/element and add the below line of code
[Form]
public class SRContextMenu extends FormRun
{
    public const int rootIdx = 1;
}
Then override the getContextMenuOptions method as shown below from the CustGroup control
image
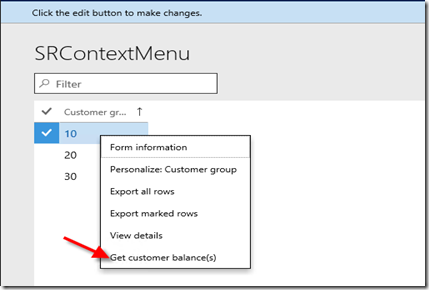
Add the below lines of code in the method. In the below example, I am adding a new new context menu option with the label – “Get customer balance(s )”
[Control("String")]
    class CustGroup_CustGroup
    {
        public str getContextMenuOptions()
        {
            str ret;
            ContextMenu menu = new ContextMenu();
            ContextMenuOption option = ContextMenuOption::Create("Get customer balance(s)", rootIdx);
            List menuOptions = new List(Types::Class);
            // Add label and ID of menu option
            menuOptions.addEnd(option);
            menu.ContextMenuOptions(menuOptions);
            return menu.Serialize();
        }

    }
Next override the selectedMenuOption() method as shown below from the CustGroup control
image
Add the below lines of code to Process the user selection from the context menu
// Define new override on the control for processing the user selection
        public void selectedMenuOption(int selectedOption)
        {
            CustTable custTable;
            AmountCur  balanceAmt;

            switch (selectedOption)
            {
                case –1:
                    break;
                case rootIdx:
                    while select CustTable where CustTable.CustGroup == CustGroup.CustGroup
                    {
                        balanceAmt += CustTable.balanceMST();
                    }
                    info(strFmt("%1", balanceAmt));
                    break;
                default:
                    break;
            }
        }
Now, lets open the form and see the newly added Context menu option. Right click on the customer group control in the grid and you will find our newly created option as shown below.

image
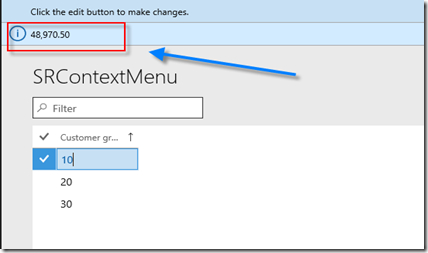
Double click on the option and it will process the context menu option. In this example, I am showing all the customer balances of that particular customer group in the Infolog
image
Some guidelines before using context menus


  • The most important commands should be at the top of the menu.
  • Remove commands that don’t apply to the current state of the element that is the target of the right-click.
  • Right-click is a shortcut. Therefore, the commands on the context menu should always be available in other places on the page.
  • Don’t create submenus of context menus. Submenus are hard to use and aren’t touch-friendly.
  • Limit the number of menu items to five.

Adding a newline into a string in C# and X++

Below is the sample code we can use for  adding a newline after every occurrence of "@" symbol in the string in C#   using System...