Thursday 26 April 2018

Unable to recycle AppPool 'AOSService' running Site 'AOSService'. Check your IIS/Azure Environment for correct deployment error in Dynamics AX 365

Severity Code Description Project File Line Suppression State
Error System.InvalidOperationException: Unable to recycle AppPool 'AOSService' running Site 'AOSService'. Check your IIS/Azure Environment for correct deployment. ---> System.Runtime.InteropServices.COMException: The object identifier does not represent a valid object. (Exception from HRESULT: 0x800710D8)
   at Microsoft.Web.Administration.Interop.IAppHostMethodInstance.Execute()
   at Microsoft.Web.Administration.ConfigurationElement.ExecuteMethod(String methodName)
   at Microsoft.Web.Administration.ApplicationPool.Recycle()
   at Microsoft.Dynamics.Framework.Tools.AosAppPoolRecycler.RecycleAppPool()
   --- End of inner exception stack trace ---
   at Microsoft.Dynamics.Framework.Tools.AosAppPoolRecycler.RecycleAppPool()
   at Microsoft.Dynamics.Framework.Tools.BuildTasks.SyncEngineWrapper.Sync(CancellationToken cancellationToken) 0

365poolerror

Got this error while synching the database.

Reason: AOS got stopped in IIS

Solution: Start the AOS

Steps:
Click Start, click Control Panel, and then click Administrative Tools.

Right-click Internet Information Services (IIS) Manager and select Run as administrator.

In the IIS Manager Connections pane, expand the computer name.

Click Application Pools. The Application Pools pane appears in Features View and start the AOS.


Monday 23 April 2018

Computed Column and Virtual fields in Dynamics 365 for operations

This article provides information about computed and virtual fields, which are the two types of unmapped fields that a data entity can have. The article includes information about the properties of unmapped fields, and examples that show how to create, use, and test them.

Overview

A data entity can have additional unmapped fields beyond those that are directly mapped to fields of the data sources. There are mechanisms for generating values for unmapped fields:
  • Custom X++ code
  • SQL executed by Microsoft SQL Server
The two types of unmapped fields are computed and virtual. Unmapped fields always support read actions, but the feature specification might not require any development effort to support write actions.

Computed field

  • Value is generated by an SQL view computed column.
  • During read, data is computed by SQL and is fetched directly from the view.
  • For writes, custom X++ code must parse the input value and then write the parsed values to the regular fields of the data entity. The values are stored in the regular fields of the data sources of the entity.
  • Computed fields are used mostly for reads.
  • If possible, it's a good idea to use computed columns instead of virtual fields, because they are computed at the SQL Server level, whereas, virtual fields are computed row by row in X++.

Virtual field

  • Is a non-persisted field.
  • Is controlled by custom X++ code.
  • Read and write happens through custom X++ code.
  • Virtual fields are typically used for intake values that are calculated by using X++ code and can't be replaced by computed columns.

Properties of unmapped fields

CategoryNameTypeDefault valueBehavior
DataIsComputedFieldNoYesYes
  • Yes – The field is synchronized as a SQL view computed column. Requires an X++ method to compute the SQL definition string for the column. The virtual column definition is static and is used when the entity is synchronized. After that, the X++ method is not called at run time.
  • No – The field is a true virtual field, where inbound and outbound values are fully controlled through custom code.
DataComputedFieldMethodStringA static DataEntitymethod in X++ to build the SQL expression that will generate the field definition. This property is disabled and irrelevant if the property IsComputedField is set to No. The method is required if the property IsComputedField is set to Yes.
DataExtendedDataTypeString

Example: Create a computed field

In this example, you add a computed field to the FMCustomerEntity entity. For reads, the field combines the name and address of the customer into a nice format. For writes, your X++ code parses the combined value into its separate name and address values, and then the code updates the regular name and address fields.
  1. In Microsoft Visual Studio, right-click your project, and add the existing FMCustomerEntity.
  2. In Solution Explorer, right-click the FMCustomerEntity node, and then click Open.
  3. In the designer for FMCustomerEntity, right-click the FMCustomerEntity node, and then click New > String Unmapped FieldCreating a new string unmapped field
  4. Rename the new field NameAndAddress.
  5. Update properties of the NameAndAddress unmapped field, as shown in the following screenshot. Updating the properties of the NameAndAddress unmapped field
  6. Go to FMCustomerEntity > Methods. Right-click the Methods node, and then click New. Ensure that the method name matches the DataEntityView Method property value of the unmapped computed field.
  7. Paste the following X++ code into the method. The method returns the combined and formatted NameAndAddress value. Note: The server keyword is necessary.
    private static server str formatNameAndAddress()   // X++
    {
        DataEntityName      dataEntityName= tablestr(FMCustomerEntity);
        List                fieldList = new List(types::String);
        ////Format name and address to look like following
        ////John Smith, 123 Main St, Redmond, WA 98052
        fieldList.addEnd(SysComputedColumn::returnField(DataEntityName, identifierstr(FMCustomer), fieldstr(FMCustomer, FirstName)));
        fieldList.addEnd(SysComputedColumn::returnLiteral(" "));
        fieldList.addEnd(SysComputedColumn::returnField(DataEntityName, identifierstr(FMCustomer), fieldstr(FMCustomer, LastName)));
        fieldList.addEnd(SysComputedColumn::returnLiteral("; "));
        fieldList.addEnd(SysComputedColumn::returnField(DataEntityName, identifierstr(BillingAddress), fieldstr(FMAddressTable, AddressLine1)));
        fieldList.addEnd(SysComputedColumn::returnLiteral(", "));
        fieldList.addEnd(SysComputedColumn::returnField(DataEntityName, identifierstr(BillingAddress), fieldstr(FMAddressTable, City)));
        fieldList.addEnd(SysComputedColumn::returnLiteral(", "));
        fieldList.addEnd(SysComputedColumn::returnField(DataEntityName, identifierstr(BillingAddress), fieldstr(FMAddressTable, State)));
        fieldList.addEnd(SysComputedColumn::returnLiteral(", "));
        fieldList.addEnd(SysComputedColumn::cast(
            SysComputedColumn::returnField(DataEntityName, identifierstr(BillingAddress), fieldstr(FMAddressTable, ZipCode)), "NVARCHAR"));
        return SysComputedColumn::addList(fieldList);
    }
    
    T-SQL for the computed column.
    ( Cast (( ( T1.firstname ) + ( N' ' ) + ( T1.lastname ) + ( N'; ' ) +
                ( T5.addressline1 )
            + ( N', ' ) + ( T5.city ) + ( N', ' ) + ( T5.state ) + (
            N', '
            ) +
                ( Cast(T5.zipcode AS NVARCHAR) ) ) AS NVARCHAR(100))
    )
        AS
    NAMEANDADDRESS
    
    Tip: If you receive error in data entity synchronization because of computed columns, it's easier to come up with the SQL definition in Microsoft SQL Server Management Studio (SSMS) before using it in X++.
  8. Rebuild the project.
  9. Synchronize the database. Don't forget this step. You can do this by going to Dynamics 365 **> **Synchronize database > Synchronize.

Example: Create a virtual field

In this example, you add a virtual field to the FMCustomerEntity entity. This field displays the full name as a combination of the last name and first name. X++ code generates the combined value.
  1. In the designer for the FMCustomerEntity entity, right-click the Fields node, and then click New > String Unmapped Field.
  2. In the properties pane for the unmapped field, set the Name property to FullName.
  3. Set the Is Computed Field property to No. Notice that you leave the DataEntityView Method empty. Setting the properties for the unmapped field
  4. In the FMCustomerEntity designer, right-click the Methods node, and then click OverridepostLoad. Your X++ code in this method will generate the values for the virtual field.
  5. Paste the following X++ code in for the postLoad override. Notice that the postLoadmethod returns void.
    public void postLoad()
    {
        super();
        //Populate virtual field once entity has been loaded from database
        //Format full name - "Doe, John"
        this.FullName = this.LastName + ", " + this.FirstName;
    }
    
  6. Compile your project.

Example: Use a virtual field to receive and parse an inbound field

Imagine that an external system sends the name of a person as a compound value that combines the last and first names in one field that comes into our system. However, our system stores the last and first names separately. For this scenario, you can use the FullName virtual field that you created. In this example, the major addition is an override of the mapEntityToDataSourcemethod.
  1. In the designer for the FMCustomerEntity, right-click the Methods node, and then click Override > mapEntityToDataSource.
  2. Paste the following X++ code in for the mapEntityToDataSource method.
    public void mapEntityToDataSource(DataEntityRuntimeContext entityCtx, DataEntityDataSourceRuntimeContext dataSourceCtx)
    {
        super(entityCtx, dataSourceCtx);
        //Check if desired data source context is available
        if (dataSourceCtx.name() == "FMCustomer")
        {
            FMCustomer dsCustomer = dataSourceCtx.getBuffer();
            //Find position of "," to parse full name format "Doe, John"
            int commaPosition = strfind(this.FullName, ",",0,strlen(this.FullName));
            //Update FirstName and LastName in the data source buffer to update
            dsCustomer.LastName = substr(this.FullName,0,commaPosition-1);
            dsCustomer.FirstName = substr(this.FullName, commaPosition+1, strlen(this.FullName));
        }
    }
    
    Note: When update is called, mapEntityToDataSource methods are invoked for each data source.

Test the computed and virtual fields

The following main method tests your computed and virtual fields. Both fields are tested in a read action, and the virtual field is tested in an update action.
  1. For this example, ensure that you have the data set named Fleet Management (migrated). The data set is available from the dashboard in the browser. Click the menu icon in the upper-right corner, click the APP LINKS menu, and then scroll to find the data set named Fleet Management (migrated).
  2. Paste the following X++ code into the startup object of your project. Run your project.
    public static void main(Args _args)   // X++
    {
        FMCustomerEntity customer;
        //Using transactions to avoid committing updates to database
        ttsbegin;
        //SELECT single customer entity record from the database
        select customer
            where customer.Email == "phil.spencer@adatum.com";
        //Read full name (Virtual Field)
        info(customer.FullName);
        //Read formatted NameAndAddress(computed Field)
        info(customer.NameAndAddress);
        //UPDATE full name (virtual field)
        customer.FullName = "Doe, John";
        customer.update();
        //Reselect data from database to get updated information
        select customer
            where customer.Email == "phil.spencer@adatum.com";
        //Read full name (virtual field)
        info(customer.FullName);
        ttsabort;
    }
Refer https://docs.microsoft.com/en-us/dynamics365/unified-operations/fin-and-ops/index for more info.

Wednesday 18 April 2018

Share personalizations with other users in Dynamics 365 Operations

Hi All ,

In dynamics 365 operations we have an option to share the user interface personalizations with other users.
Go to personalization of the screen and export it to your local system.


 Then import the file into other users system as shown below.


Please make sure that this will replace the existing personalization.

Tuesday 17 April 2018

How to download Dynamics 365 VM Demo

You can access asset library to download VM, just follow this steps

1-go to this link

https://signup.microsoft.com/signup

 then fill information


2- click next to select your country and ...etc 


 3- click create account

you can verify with a call or SMS complete  


4-you are ready to go


5- press ctrl+shfit = N to open the browser in private mode and log in with your account 

https://portal.office.com


6- log in Life Cycle Service 

 https://lcs.dynamics.com


7- accept the agreement and privacy statement


8-click on customer organization to open projects


9-create new project


assign the name and select product name,.etc


10- go to the asset library


11-you can see the below asset types.

click downloadable VHD and click import


you can import files one by one until complete.

12- after complete import, just click on file to download on your local PC


Actual post : http://dynamics365ax2012.blogspot.ae/2018/04/how-to-download-dynamics-365-vm.html

Customize with extensions and overlayering in AX 365

This topic discusses the two methods of customizing source code and metadata of model elements - overlayering and extensions and details supported extension capabilities.

Overlayering

You can customize source code and metadata of model elements that are shipped by Microsoft or third-party Microsoft partners. In order to customize metadata and source code of a model, the developer must create a new model that overlays the model they want to customize. For example, solution developers can provide code in the SLN layer, independent software vendors can use the ISV layer, and value-added resellers can use the VAR layer. Functionality defined in higher layers (VAR layer in this example) can override the functionality of lower layers. The overlaying model must belong to the same Package as the source model and belong to a layer that is higher than the source model. Overlayering is a powerful tool to perform advanced customizations of metadata and source code, but may increase the cost of upgrading a solution to a new version. Click on this link to open an Office Mix that provides a good introduction on how to customize model elements.

Extensions

You can customize an application by using extensions. An extension enables you to add functionality to existing model elements and source code. Extensions provide the following capabilities:
  • Creating new model elements.
  • Extending existing model elements.
  • Extending source code using class extensions.
  • Customizing business logic. Ways to customize business logic include:
    • Creating event handlers to respond to framework events, such as data events.
    • Creating event handlers to respond to event delegates that are defined by the application.
    • Creating new plug-ins.
To get started, review or complete this tutorial: Customize model elements using extensions.

Extension models and packages

You can create a model that contains only new model elements, new code, or extensions. This model is compiled into its own separate assembly. These assemblies, along with related metadata and runtime artifacts can be packaged (as a deployable package file) and deployed on runtime sandbox or production environment. To create an extension model, go through the Create model wizard and select Create new package on the second step.
./media/1_cust.png
Extension models have several advantages, including:
  • Application lifecycle management (ALM): Extension models simplify and improve the performance of deployments, builds, test automation and delivery to customers.
  • Design time performance: Building your model or project doesn't require you to recompile the entire application.
  • Servicing: In the cloud, Microsoft can install, patch, upgrade, and change internal APIs without affecting your customizations.
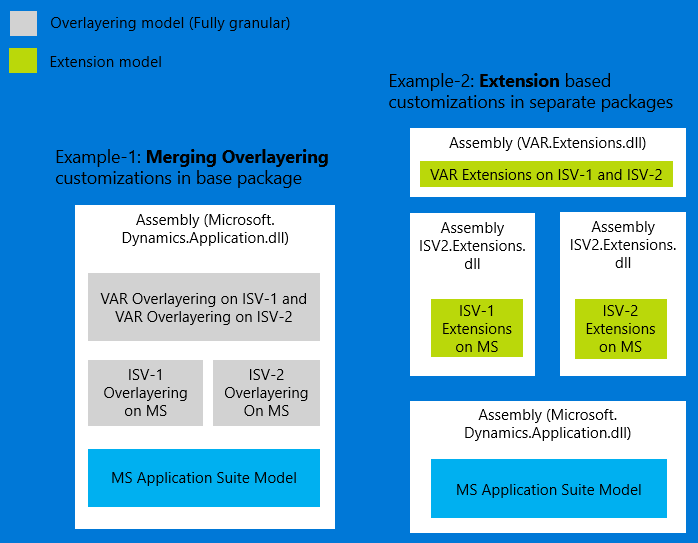
  • Upgrades: Unlike overlayering, extensions reduce the cost of upgrading to a new version, as this approach eliminates costly code and metadata conflicts.
The following diagram illustrates how extensions get isolated in their assemblies.
media/ax7customization1.png

Code extensions

You can extend source code in 3 ways:
  • By subscribing to events (framework events and delegates)
  • By writing plug-ins.
  • By creating class extensions (aka class Augmentation), see section below.
You should understand the following characteristics of framework events:
  • Events are implemented as multi-cast delegates, which means that more than one event handler can be subscribed to any particular event.
  • Events are broadcast; there's no sequencing of calls to event handlers.
  • Event handlers execute within the transaction scope of the base methods.

Events

Events are raised as preceding and succeeding operations around the base methods. This means that you have the opportunity to run code before a base method is called and after it has completed. Microsoft Dynamics AX 2012 introduced XPP events, which are also available in this release and can be subscribed to in your extensions.

Plug-ins

Plug-ins are extension points that are defined by the base application. By using a class-factory pattern, plug-ins enable you to replace the base functionality. You can see how to implement a plug-in in the tutorial, Customize model elements using extensions.

Class Extensions

Class extensions enable you to augment a class by adding methods and variables to existing classes, tables and forms. For more details refer to the topic class extensions.

Form extensions

You can extend the functionality of a form by extending its controls and data sources. For example, in a form extension, you can:
  • Add a new control.
  • Enable or disable a control.
  • Change the text or label property of a control.
  • Change a control's visibility.
  • Change a form's help text.
  • Change a form's caption.
  • Add a new data source.
  • Add a form part.
Other ways to customize a form, such as reordering controls in the form are planned to be included in a future release. In Microsoft Dynamics AX 2012, you could override form methods. In the current version, you use extensions to implement event handlers that are called from the base implementations of form methods. The following table lists each method and its associated events.
Published form DataSource methodPreceding eventSucceeding event
activeN/AActivated
deleteDeletingDeleted
validateWriteValidatingWritingValidatedWrite
writeWritingWritten
createCreatingCreated
executeQueryN/AQueryExecuted
linkActiveN/APostLinkActive
initN/AInitialized
validateDeleteValidatingDeleteValidatedDelete
rereadN/AReread
selectionChangedN/ASelectionChanged
markChangedN/AMarkChanged
leaveRecordLeavingRecordLeftRecord
Published form Object methodPreceding eventSucceeding event
initInitializingInitialized
closeClosingN/A
runN/APostRun
activateN/AActivated
Published form Control methodPreceding eventSucceeding event
modifiedN/AModified
validateValidatingValidated
leaveLeavingLostFocus
enterN/AEnter
gotFocusN/AGotFocus
clickedN/AClicked
selectionChangeSelectionChangingN/A
pageActivatedN/APageActivated
allowPageDeactivateAllowPageDeactivateN/A
expandExpandingExpanded
tabChangedN/ATabChanged
dialogClosedN/ADialogClosed

Code behind extension forms

You can use class extensions to author X++Â logic associated with form extensions. This allows the definition of state variables accessible to form and control event handlers. It also allows overriding form methods without overlayering code. Refer to this blog article for an example.
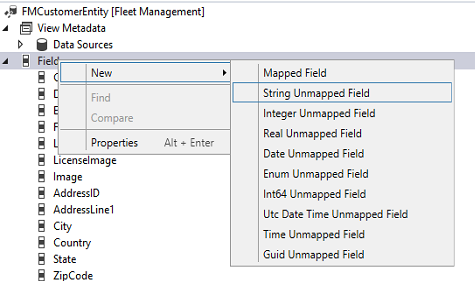
Table extensions

You can create a table extension to extend a table's design and logic. You can add new fields, field groups, indexes, mappings and relations. You can also add new fields to existing field groups, change the label of a table field, change the Created By, Created Date Time, Modified By, Modified Date Time properties. Using table extensions, you can also change the Extended Data Type property on fields and set it to an EDT that is derived from the current EDT (This is available as of platform update 8).
In Microsoft Dynamics AX 2012, you could override the virtual methods of a table's base class to control the behavior that occurred during table operations, such as when creating, reading, updating, or deleting. In the current version, you instead use extensions to implement event handlers that are called from the base implementations of the table methods. The following table lists each table method and its events.
Published Table methodPreceding eventSucceeding event
validateWriteValidatingWriteValidatedWrite
validateDeleteValidatingDeleteValidatedDelete
validateFieldValidatingFieldValidatedField
validateFieldValueValidatingFieldValueValidatedFieldValue
modifiedFieldModifyingFieldModifiedField
modifiedFieldValueModifyingFieldValueModifiedFieldValue
InsertInsertingInserted
UpdateUpdatingUpdated
DeleteDeletingDeleted
InitvalueInitializingRecordInitializedRecord
FinalDeleteValidationExecuted when a delete operation is performed on a table object, before the operation is committed to the underlying database tableN/A
FinalInsertValidationExecuted when an insert operation is performed on a table object, before the operation is committed to the underlying database tableN/A
FinalReadValidationExecuted when a read operation is performed on a table object.N/A
FinalUpdateValidationExecuted when an update operation is performed on a table object, before the operation is committed to the underlying database table.N/A
Validation events capture and return results by using the DataEventArgs parameter. The display and edit method modifiers are supported on table extensions.

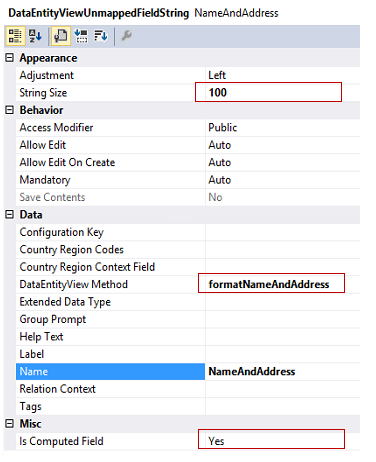
View and Data entity extensions

You can extend a View or Data entity to achieve much of the functionality available with table extensions.
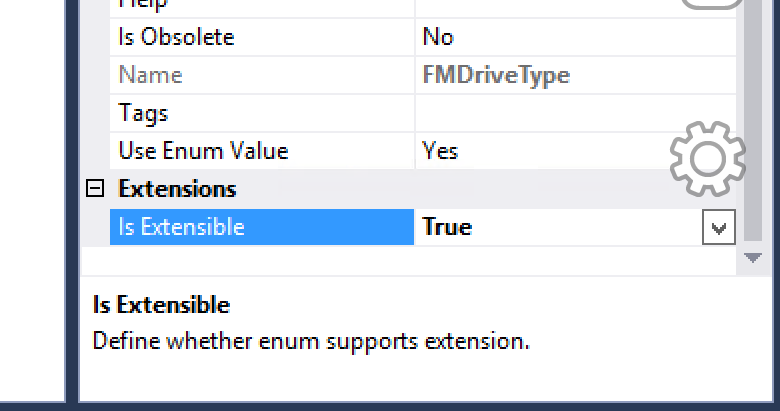
Enum extensions

You can extend any Enum that is marked extensible (IsExtensible=True).
extensibleenums
By extending an Enum, you can add new Enum values to it. It is important to keep the following in mind when dealing with extensible Enums:
  1. You cannot have X++ logic that depends on the integer value of Enum values (For example. If (Enum1.v1 > Enum1.v2) ... is not supported for extensible enums)
  2. When Enum values of extensible Enums are synchronized into the database:
    • Integer values that belong to the baseline enum are deterministic, they come from the metadata.
    • Integer values that are an extension are generated during the synchronization process and are not deterministic.

EDT extensions

You can extend an EDT element in order to modify any of the following properties:
  • Form help
  • Label
  • String size
  • Help text

Query extensions

You can extend a Query element to achieve the following:
  • Add ranges to an existing data source.
  • Add new (embedded) data sources to an existing data source.
  • Add new fields to an existing data source.
You can extend a Menu element to achieve the following:
  1. Add new menu items, submenus, menu references and tile references to an existing menu.
  2. Hide an existing menu item, tile, or sub-menu in a menu by setting the Visible property to No.

Security role and duty extensions

You can extend a Security Role or a Security Duty to add new duties/privileges to these elements.

Report extensions

You can customize reports and business docs using extensions, below is a list of tutorials that help you learn more.
Customizing App Suite reports using extensions: Customizations to reporting solutions in the standard application are fully supported using a pure ‘Extension’ model. This article offers guidance on how to add the most common customizations to standard application reports without over-layering Application Suite artifacts. Here are some…
How To: Custom designs for business docs: This article focuses on the steps involved in crafting a custom report design for an existing application business document using a ‘pure’ extension model. Follow the steps below to associate a custom report design with an application document instance….
How To: Expanding App Suite report data sets: This article focuses on the expansion of an existing report data set produced using X++ business logic in a Report Data Provider (RDP) class. Use custom delegate handlers and table extensions to include additional field data and/or calculations without…
How To: Extending report menu items: This article focuses on the process of extending existing application menu items to redirect navigations with minimal code changes. Using this technique you will avoid the hassle of tracking down and replacing all references to an existing application…

Label extensions

You can create label extension files in order to modify the string value of a label, add new labels to the same label file or add new languages. To create a label extension file you must name it with a _extension suffix. For example, to extend the FLM labels of the Fleet Management model, do the following:
  1. Create a project that belongs to a model that references Fleet Management (The model Fleet Management Extension is an example).
  2. Add a new label file to the project and name it FLM_Extension.
  3. Within the FLM_Extension label file, you can create new labels or modify the value of labels that are defined in the FLM label file of the Fleet Management model. Use the standard label editor to define new labels or redefine labels that already exist in the original FLM label file.
  4. If your goal is to create translations of the FLM label, right-click on the FLM_Extension element in your project and select Add new languages. Follow the wizard to add translation files to the FLM labels.
Note
If the FLM_Extension file already exists in another model, you can name your file FLM_ExtensionN where N is any integer (For example FLM_Extension2, FLM_Extension3, ...etc)

Extension of Country/Region Codes

Note
This functionality is available as of Platform update 7.
The Country Region Codes property enables developers to restrict functionality to certain regions or countries based on the current legal entity’s primary address. Developers can extend this functionality by setting the Country Region Codes property on the following extension element types: Menu extension, Menu Item extension, Table extension (and fields), Form extensions (form controls), EDT extensions, Enum extensions, and View extensions.
You can specify additional country/region codes in their extension. The effective country/regions (at runtime) associated with an element will be the union of all codes from the baseline element and all its extensions.

Event argument types

When an event takes place, the delegates described in the sections above get triggered. In this section, we provide the details of the types of the arguments that are passed as the event arguments. Some of the entries in the table below have a null in the column designating the event args; this means that no arguments are passed - the relevant information is in the first argument (typically called sender) in this case.
EventArgument type
onDefaultedFieldDefaultFieldEventArgs
onDefaultedRownull
onDefaultingFieldDefaultFieldEventArgs
onDefaultingRownull
onDeletednull
onDeletedEntityDataSourceDataEntityContextResultEventArgs
onDeletingnull
onDeletingEntityDataSourceDataEntityContextResultEventArgs
onFindingEntityDataSourceDataValidationEventArgs
onFindingEntityDataSourceDataEntityContextRecordEventArgs
onFoundEntityDataSourceDataEntityContextRecordEventArgs
onGettingDefaultingDependenciesDefaultingDependenciesEventArgs
onGotDefaultingDependenciesDefaultingDependenciesEventArgs
onInitializedEntityDataSourceDataEntityContextEventArgs
onInitializedRecordnull
onInitializingEntityDataSourceDataEntityContextEventArgs
onInitializingRecordnull
onInsertednull
onInsertedEntityDataSourceDataEntityContextResultEventArgs
onInsertingnull
onInsertingEntityDataSourceDataEntityContextResultEventArgs
onMappedDatasourceToEntityDataEntityContextEventArgs
onMappedEntityToDataSourceDataEntityContextEventArgs
onMappingDatasourceToEntityDataEntityContextEventArgs
onMappingEntityToDataSourceDataEntityContextEventArgs
onModifiedFieldModifyFieldEventArgs
onModifiedFieldValueModifyFieldValueEventArgs
onModifyingFieldModifyFieldEventArgs
onModifyingFieldValueModifyFieldValueEventArgs
onPersistedEntityDataEntityContextEventArgs
onPersistingEntityDataEntityContextEventArgs
onPostedLoadnull
onPostingLoadnull
onUpdatednull
onUpdatedEntityDataSourceDataEntityContextResultEventArgs
onUpdatingnull
onUpdatingEntityDataSourceDataEntityContextResultEventArgs
onValidatedDeleteValidateEventArgs
onValidatedFieldValidateFieldEventArgs
onValidatedFieldValueValidateFieldValueEventArgs
onValidatedWriteValidateEventArgs
onValidatingDeleteValidateEventArgs
onValidatingFieldValidateFieldEventArgs
onValidattingFieldValueValidateFieldValueEventArgs
onValidatingWriteValidateEventArgs

Development tools support

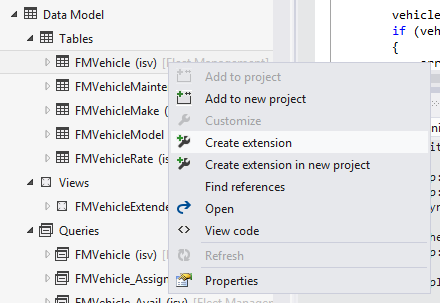
The development tools in Visual Studio provide integrated features to help you create and work with extensions. For example, when you right-click an element name in Application Explorer, you can create an extension for that element.
3_Cust
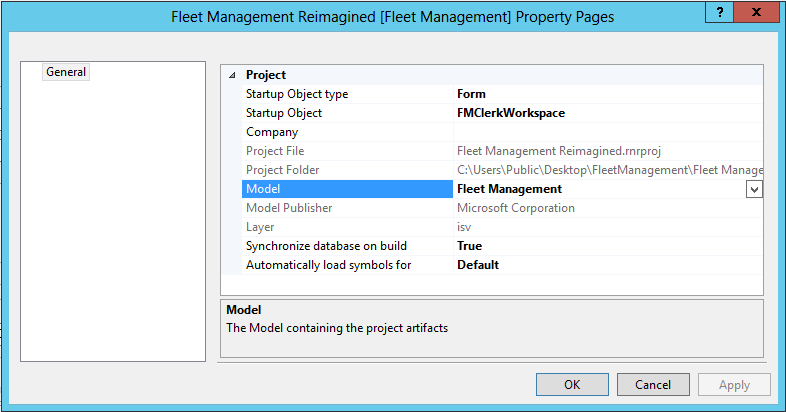
To create an extension, the current project in Solution Explorer must belong to a model that references the model of the selected element in Application Explorer. To view the model for a particular project, view the project properties.
4_Cust
Visual Studio creates the extension file for you, either in the current project or in a new project. You can then work with the extension file either as source code or by using a designer. You package a code-extension model for deployment exactly like you would package any other model. On the Dynamics 365 menu, point to Deploy, click Create Deployment Package, and then select the check box for the package name.
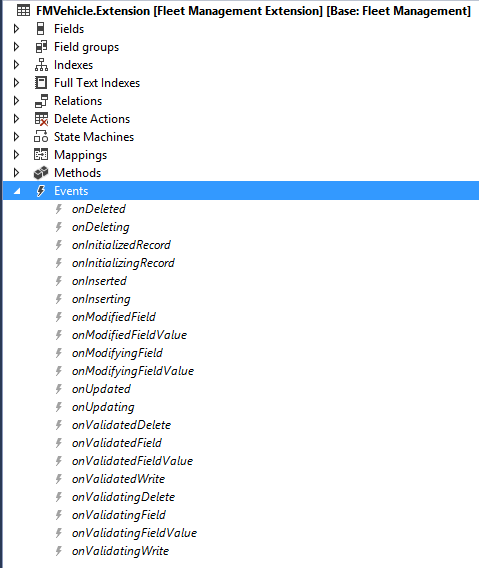
Framework events

Tables, form data sources, form controls, and other element types that support extension events list the available events (and delegates) under an Events collection node. For example, viewing the Events node of a table extension shows events that are defined by the framework, and delegate methods that are defined by application developers.
5_Cust
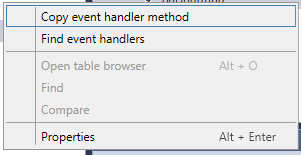
Note: Events are exposed on the designer on different element and sub-element types, like table events, form events, form data source events, form control events, and others. Open the context menu of an event node to interact with events:
6_Cust
  • Copy event handler method: This option copies a method signature to the clipboard. You can paste it in any X++ code editor to define a method that subscribes to the selected event.
  • Find event handlers: Searches and lists all methods subscribed to the selected event.

Actual post:
https://docs.microsoft.com/en-us/dynamics365/unified-operations/dev-itpro/extensibility/customization-overlayering-extensions


Adding a newline into a string in C# and X++

Below is the sample code we can use for  adding a newline after every occurrence of "@" symbol in the string in C#   using System...